Changelog
Thanks for all the support people! You motivate me!!! If there are any grammatical errors, please let me know in the comments below.
1/13/2018 - Two more war stories on solo victories.
8/27/2017 Weekend - Guide is 99% complete. Proof-reading done.
8/19/2017 Weekend - Added even more information and sections. Organized the guide a little.
8/10/2017 Weekend - Added more sections and information such as MOUT. Organized the guide more.
8/7/2017 - Basic guide written.
Introduction
This guide will improve your ability to survive and kill. It will not guarantee your chance of winning.
PUBG (pronounced Pub-'G') is a battle royale game where up to 100 people parachute into an island and try to kill each other. It is 99% boredom and 1% sheer terror.
I win a game once every 10 hours. This game is hardcode, unforgiving, and, at times, completely unfair. Even taking a single step or waiting a few seconds too long has severe consequences. Ironically, you can win without killing a single person! Understand the risks and rewards before you make a decision. And you need to do a cost to reward analysis frequently with the time constantly running out.
You'll need every single advantage you can get. This guide is full of many seemingly insignificant minor details. But every sentence in this guide may save your life, give you a massive advantage, or open up options which were previously invisible. You may have to read this guide again after dying a few times to see if you could have done something different.
After 100 hours, I have won:
1 solo, 2 solo FPP
2 duos, 2 duo desert
1 duo FPP
1 squads FPP
Most of your deaths will probably be followed by the phrase, "I should have..." A lot of them are pretty preventable.
I expect no one to read this guide because no one reads. The average person reads 0-2 books a year. If you've come this far, then by me making this guide, I will have accelerated your learning. You'll learn alot of obscure stuff that took many deaths to learn.
The game is separated into distinct phases.
1) Gather guns then move rapidly to the Zone
2) Gather then move into the Zone
3) Gather then move slowly into the zone
4) Move even slower into the zone
5) At this point, you should have a rifle, some bullets, and some meds.
6) Top 10, Try to win.
My basic strategy is:
"Try to get to the top 10."
I should say that people who are in the top 10 are not stupid, and at least one of them is in a ghillie suit with a AWM sniper rifle behind the last tree you'd expect to look at. AND the zone will close in on them 5x in a row! What horrible luck for you!
If you've gotten that far, your odds of winning are high. Pray to the Random Number Generator (RNG) gods.
Read the guide, check the war stories to see how it is all put together, play the game, talk to your buddies, watch pros play, and then repeat.
So here it is.
One Time Setup
Set Foliage to low
You'll end up having less grass nearby. The grass will not render at long distances. So if you are far away, don't expect low grass to render and hide you. If you are in a small, restricted combat zone, grass WILL render, so feel free to go prone and disappear.
Use Discord or Teamspeak to team chat
Communications is the key to teamwork. Without it, you'll die. So buy a good headset. If you don't, then you'll find that this game will get a lot more difficult, because you can't afford to shell out $20.
Use headphones
With good headphones, you can hear a mouse fart AND know the direction AND distance.
Utility Belt
Wear this. It adds +50 capacity.
Hotkeys
Set your hotkeys for your medical equipment. You don't need to open up your inventory to use them.
Boost your FPS
Check out this guide here. The game will have non-network lag occasionally. Rarely will it happen at the moment of enemy contact. That happened to me once in 80 hours and I died. Still, this won't hurt you.
Game Modes
I think solo is easier than duo since you don't have to use any coordinated team tactics.
Squad is just complicated double duo. If one of your people get blasted, your team suffers a 25% loss of efficiency for the rest of the game.
In terms of win rate, it's easier to win with squads since it is more forgiving due to the "downed/ revive" system.
Controls
Adjusting Sights
This is normally unnecessary since most of your combat engagements will be at 100m or less. If you want to do it anyways, aim in your sights and press PAGE UP or PAGE DOWN. You'll see the "elevation number" in your sights when you aim down in first person. Adjust for aim accounting for bullet drop. That's what everyone does and it's easier.
Further Lean
Go to a corner. Aim down your sight in third person. Hold a lean button. You can see even more beyond the corner without exposing yourself.
Picking up stuff
Go on top of a pile of items. Open up the inventory button. You can either:
1) Right click to instantly pick up stuff.
2) Drag and drop from the floor to your inventory as fast as possible. (this is faster).
Gun Attachments
Right clicking a gun attachment in your inventory can instantly put that on your gun. It works the same to remove a gun attachment.
Crouch Jumping
Press jump and crouch at the same time to be able to go through certain things like windows and walls.
Swivel your head
While running, hold alt to look around without changing direction or slowing down.
Cycle Grenade
Tap the '5' to cycle through grenades. No need to open up your inventory to swap grenades.
Clothes
The clothes may help you blend into your environment.
Grey clothes are excellent for blending into rocks.
Dark clothes are excellent for blending into shadows.
I remember seeing a guy run out in an open grass field wearing black clothes. That guy got blasted real quick.
I normally wear dark clothes.
- Ballistic masks and gas masks don't do anything
Shoes mask sound. Barefoot makes more noise in dirt.
Ghillie Suit
You are basically invisible while you are prone. Some pro-streamers take off their secondary weapon to mitigate detection.
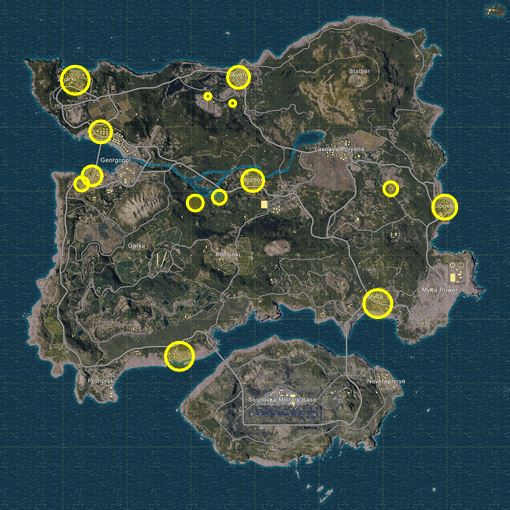
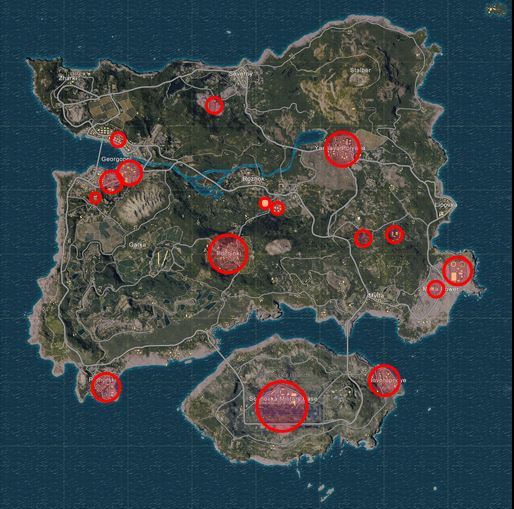
Map - The Island
The Map[pubgmap.io]
Check out this island map. Check out the odds. If you're completely new to the game, try to go to each location several times.
You will see a grid on the map. Each little square is 100m. Each big square is 1000m or 1km or 1 click.
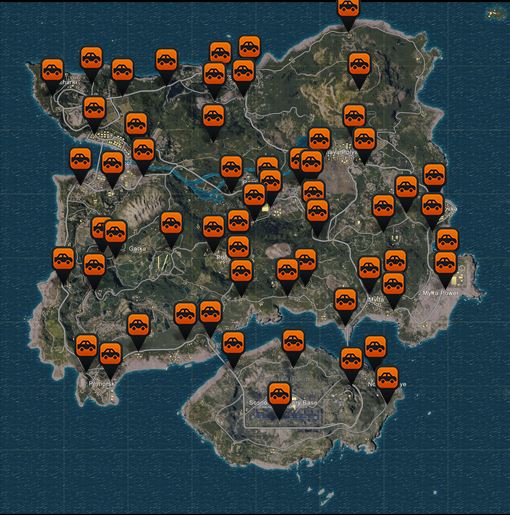
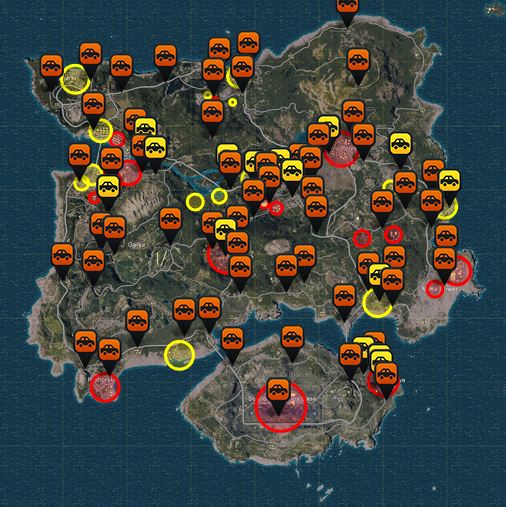
Take note that vehicles spawn mostly near roads or in "town garages." Boats mostly spawn in the southern coastline. Not the north.
Remember this:
More buildings in one place have more loot. Loot attracts people. People are dangerous. Therefore buildings are dangerous.
Or for brevity:
More Buildings = More Loot + More Danger
=====
Spawn Island
You can go back here, you can get some stuff, but you need to find a boat, go here, loot quickly, and then go back. Because it is really far away, no one really goes here.
=====
Northern Area
---
Zharki - Really quiet, at the edge of the map. Get a boat or vehicle or risk being zoned out.
Georgopol - Somewhat warm. Lots of excellent loot after raiding 2-3 highrise apartments.
South Georgopol - Very high risk
Severny - Really quiet.
Gun Range - Guaranteed chance of getting a gun.
Stalber - No one goes here.
Yasnaya - Dangerous. Good place.
=====
Middle Area
Water town (aka Venice or New Orleans or Atlantis) - Good gear, quiet
Ruins - Ok gear
Gatka - Quiet, is so-so.
Rozhok - Near suicide.
Apartments - Near suicide.
Pochinki - Near suicide.
Villas - Good starter
Bunkers - Annoying maze like place. Easy to get lost. (map)
Crater - Decent. Easy to get outflanked by people on the upper cliffs.
Mylta - Good, mildly dangerous.
Woodcutter camp - Horrible Drops, Nobody goes here.
Mylta Power - Decent, Slightly dangerous.
Lipovka - Far away.
Primorsk - Good, get a boat.
Pier Town (Fish Town) - Good, Quiet-ish
=====
South Area
---
Any of the Bridges - Call them "suicide bridge left" and "suicide bridge right" because you'll have a high chance dying getting on or off of it. Avoid if you can. Use boats instead. Check the video below
Military Base - Near suicide. Almost everyone goes here like flies to honey.
Novorepnoye - Lots of good loot. Boats.
Nov Radio - Decent loot.
=====
Suicide Bridge in action below.

Be Aware of These
Whether you're playing alone or on a team, you have to constantly do a self-check of these things.
Zone Awareness
The zone is the deadliest part of the game. If you do not move into the white-zone fast enough, you will not be in the optimal killing position OR you will have to sprint out of the open into the zone where you will be shot by teams of snipers. Get to the zone before you get "zoned-out." Had you had enough time, you can go in carefully (not out in the open and outflanked by snipers on all sides). Getting into the zone (or close enough) should always be your number one priority. The first level of the "blue gas" will give you very little damage. But don't be fooled, higher levels will kill you rapidly. Don't be "zoned out" or you'll be playing a Marathon and bandage Simulator. The zone may be on the opposite side of the map. You may constantly be "zoned out." Such is life in the zone. Stay in the center to maximize your minimal movement. If a new zone is about to be in effect soon, wait until you know what the new zone is before moving. It is absolutely critical to where you'll move.
Noise Awareness
Making even a tiny amount of noise will cause nearby enemies to stop. Making subsequent noise after this will alert the enemy. Even crawling makes too much noise. You can hold the walk button and move. Or you can aim and move (aim-walking). These will make much less noise than normal movement. To make no noise while moving, tap the direction button again and again. This one takes practice. Silence is absolutely golden in this game.
Bloodlust
In this game, if you want to win, most of the time, you have to avoid combat. By getting into combat, you may engage in a lengthy fight, which may alert people to your presence. You will most likely be wounded, looting, and expecting no one. The 2nd wave of enemy may "move after completion" (M.A.C.) to your position, finish you off, and take the stuff you stole. You may see a guy out in the open. If you shoot him, you better kill him. If you don't, he'll probably go behind a tree, heal up, and then pin YOU down. Which brings me to the next point.
Crabs in a bucket (Being Crabbed)
"If I can't have it. Neither can you."
Let's say you're running into the zone. The enemy is near you and they're also running into the zone. One of their people start shooting your people. Then your people start shooting their people. The whole situation devolves rapidly, and now you're all in a full on firefight. You're both now in the blue zone. One team dies. Then the other team attempts to run into the zone, and they all die. In the end, everyone dies. By firing in this situation, the enemy team created a lose-lose situation, which makes absolutely no sense. But they were operating irrationally by doing "Me see enemy. Me shoot enemy." Avoid the bloodlust.
Crab Mentality[en.wikipedia.org]
The Circle (aka Blue Zone, Zone, Gas)
In this section, we'll talk about the zone and what you can and can't do.
Detailed info here.
Circle 1
Diameter - 4550m
Survive outside for 4:10
Blue circle to white circle travel time: 5:00
Circle 2
Diameter: 2970m
Survive: 2:46
Travel: 2:20
Circle 3
Diameter: 1480m
Survive: 2:05
Travel: 1:30
Circle 4
Diameter - 740m
Survive: 1:40
Travel: 1:00
Revive-able, Rez-er takes 10% damage.
Circle 5
Diameter: 360m
Survive: 0:34
Travel: 0:40
Circle 5, no longer rez-able.
Circle 6
Diameter: 175m
Survive: 0:20
Travel: 0:30
Don't bother healing in these circles and up.
Circle 7
Diameter: 90m
Survive: 0:15
Travel: 0:30
Circle 8
Diameter: 40m
Survive: 0:10
Travel: N/A
Circle 9
Diameter: Closes to 0m
Pop and drink everything and pray.
=====
- If you're out of the zone, people will assume you're not there.
- if you pop people that are out of the zone, you can cause them massive panic.
Circle 1-4: Bandages can easily heal these
Circle 5: Use a booster item
Circle 6: first Aid Kits needed
Circle 7: impossble
- The fat end of the blue circle closes in slower.
- People are probably in the fat end of the blue circle.
- If you are zoned out, the dotted line towards the center of the zone will appear.
- When the blue circle closes in, it's like this scum scraper. People are forced to run in and are generally near the edge of the blue circle. During this time, the blue edge may be more dangerous.
Weather and Time
When the play area gets darker, you can't see as much. It also gets harder to spot people.
When it rains, the rain masks all of the running noise and reduces visiblity. Everything looks much darker too.
Red Zone - Artillery
Bombs drops at random positions in the red zone. One good hit will kill you (or down you, if you're playing a team game).
The odds of a bomb hitting you, in my experience, is somewhat low.
- If you're in building, you can still get hit if you stand near the windows or a door (open or closed).
- If you're in a car, one hit will kill all of you.
- Possible warning: You may even die inside the building even if you're in cover.
[Guess] - Red zones only appear on a random player.
Movement Speeds
Detailed Movement Guide Here
Running 1 white square (100m)
To sum it up:
Sprinting unarmed = 16 seconds
Sprinting armed = 17 seconds
Crawling = 83 seconds
Melee Combat
Melee combat is really a hit or a miss. Literally, you'll miss a lot. You only use melee in the beginning of the game. I remember chasing a guy who was out in the open and had shotgun. I hit him with a crowbar. I managed to get him because he was so bad.
-A pan will block all shots even arrows. Always wear one.
Superman Punch
Jump while sprinting. While in the air, punch. This does more damage than regular punching.
Head Punching
Aim for people's faces for more damage. Go first person and aim above their head to actually hit their head.
Weapons and Armor
Check out the steam guides for detailed information.
Weapons Guide
Armor Guide
Below is a condensed version.
Assault Rifles
Assault rifles are all roughly the same. M4, AK, Scar is full auto.
Shotguns
All shotguns do the same damage except the auto (slightly less). They do a lot of damage to people at close range.
2 Shot Shotgun - Very slow.
Pump Shotgun - Get the shotgun choke for a tighter shot pattern.
S12K - The motherload of close range combat weapons. You can clear out an entire team in a house with this auto shotgun.
-Note: 3rd person aim (maybe not accurate) and 1st person aim (accurate) at close ranges have different results. Test it out personally.
Sniper Rifles
VSS - Quiet but weak. People won't know who is shooting them.
Kar98K - High damage, very slow. Excellent at far range
SKS - My favorite. High damage, rapid fire.
AWM - Excellent for headshots.
Machine Guns
Sub-Machine Guns are ok initially. Some people prefer them for close combat.
M249 - Wipe out cars in seconds and kill everyone inside. Good for fighting.
Sub-Machine Guns
Vector is super fast. You'll need the extended clip for this. I like UMP more than the UZI since it does more damage per shot.
Pistols
Good for initial fighitng. Don't use in the advanced stages of the game.
Bow
Good in-depth video on the crossbow.
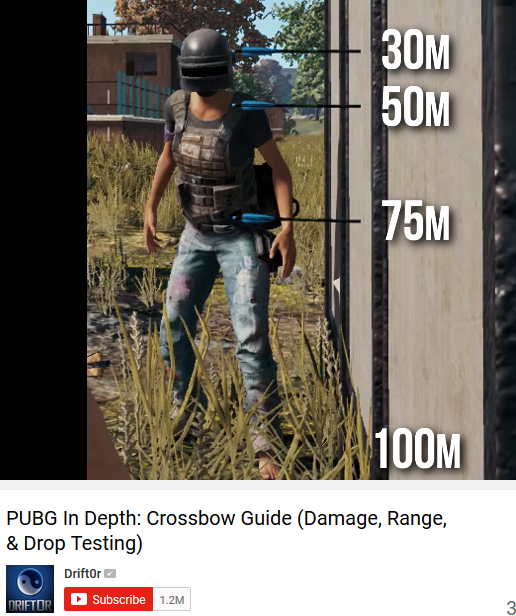
Crossbow - The crossbow reloads very slowly (5 seconds). It reloads 30% faster with the quiver. The weapon is very silent. It's difficult to hit things beyond 100m. You can add scopes to it. The bullet drops is more drastic than rifles. Always one headshot to kill. If you hit their body or miss, then they're probably going to take cover, and you're not going to be able to kill them. I've used this before and I don't recommend it for the later stages of the game due to the rate of damage and lack of range.
Damage
Limbs - 52.5
Body
Level 0 - 105
Level 1 - 74
Level 2 - 64
Level 3 - 47
Head
Level 0 - 263
Level 1 - 184
Level 2 - 156
Level 3 - 118
-Damaged Level 3 Gear is better than undamaged level 2 gear due to higher damage protection. Unless it is heavily damaged, then it might be pointless.
- Equipped items take up no weight.
Airdrop
I personally have a high chance of dying taking these (over 95% death rate). They have advanced weaponry like the AWM and SAW, tons of ammo, and the Ghillie Suit, which makes you near invisible lying down with no secondary on your back. People will SWARM to these things. Stay away from them unless you are prepared to fight everyone.
The only time you should take these is if you have the capability to get in and out quickly. The longer you stay next to the package, the higher the chance you'll have to fight more and more squads. Get out as soon as possible. You should have a near empty inventory to quickly take everything without any problems.
Normally, the best package to take is the first one when everyone is not prepared to go near it.
Ideally:
1) Empty your inventory of garbage to make room.
2) Drive in
3) Package drops down in seconds
4) Take everything in 3 seconds
5) Drive off
Typical situation: the package has been on the ground for 45 seconds. You crawl up to it, get within 10 meters of it, get shot up by 5 snipers, die.
- You CAN "catch" the package with your car and drive off. You'll have to have it land on your hood/ windshield area. I'm not sure if this is easily do-able. I don't recommend this.
Catching an Airdrop Video
- The package cannot drop on top of you and kill you.
- The red smoke is active for a set amount.
- You can camp the airdrop for kills.
Vehicles
This section will talk about vehicles. If you want something really in-depth, look at the video below.
In-depth Guide to Vehicles
Here are some basic stats. Without boost.
Bike
Top speed - 150 km/ h, Boost N/A
Fuel - 5% fuel /km
Health - 1000 (25 * 5.56 ammo) (21 * 7.62 ammo) (29 * 9 ammo)
Very fast. Hard to shoot at when at top speed and swerving. Unstable.
Bike Side Car
Top speed - 137 km/ h, Boost N/A
Fuel - 5.5% fuel /km
Health - 1000 (25 * 5.56 ammo) (21 * 7.62 ammo) (29 * 9 ammo)
A death trap. Very unstable. You'll be going at top speed, you'll hit a pebble, the vehicle will flip 10 times, and kill everyone inside. Good game.
Buggy (2 man car)
Top speed - 91 km/ h, Boost 91 km/ h
Fuel - 4% fuel /km
Health - 1550 (38 * 5.56 ammo) (33 * 7.62 ammo) (45 * 9 ammo)
Good speed, okay armor. Very exposed. Excellent for hills.
Dacia (Hard top car, my recommendation)
Top speed - 89 km/ h, Boost 116 km/ h
Fuel - 4.5% fuel /km
Health - 1800 (44 * 5.56 ammo) (38 * 7.62 ammo) (52 * 9 ammo)
Good car. Doesn't flip often. Good protection. Slow on hills.
UAZ (4 Wheel, Jeep)
Top speed - 84 km/ h, Boost 95 km/ h
Fuel - 5.5% fuel /km
Health - 2000 (49 * 5.56 ammo) (42 * 7.62 ammo) (58 * 9 ammo)
Try to get a hard-top when you can for protection. Good on hills.
Boat
Top speed - 74 km/ h, Boost 91 km/ h
Fuel - 5.5% fuel /km
Health - ???
- Hard-top vehicle is better than the soft-top. It provides more protection from bullets.
- Wait until the vehicle is at a NEAR COMPLETE STOP before exiting or you will die or take unnecessary damage.
- While driving, be careful not to hit anything, or everyone inside your vehicle will suffer an equal amount of brain damage.
- Press shift to boost your car and go faster at the expense of fuel. Bikes don't boost.
- Some areas may have sudden drop-offs. Generally, cliffs are near bodies of water. Be careful near these areas. Your teammmate (Borin) may end up driving your fully-kitted out 4-man squad into a lake. Then the zone will end up killing everyone.
- Motorcycles with the side car may flip at very high speeds thus killing everyone.
- You can drive your motorcycle indoors.
- Motorcycles take a bit of distance to slow down at high speeds, so take note of it.
- If a building has a vehicle nearby, it's probably occupied.
- Vehicles generally spawn next to roads and garages. Anywhere else is unnatural. Could be a bait vehicle.
- Ctrl + # to switch seats.
- Vehicles can run over: chain-link fences, wooden fences, some metal fencing. They cannot run over thick trees, rocks, some metal fencing.
- Try not to pop out to aim your gun if you have no chance of hitting anything. Use the vehicle's armor to help you not die.
- Vehicles make a ton of noise and will alert everyone to your presense.
- To fill a car with fuel, go inside one, right click a gas can in your inventory.
Survive Top Speed Bailout
When you are driving at 100mph and jump out, you will fly out with forward momentum at 100mph, land, and then die. However, if you bailout and fly out into a tall-enough wall or object (do not drive the car into a wall. The car must keep going), then your forward momentum goes to 0 mph, you land gracefully, and take no damage. This is very useful if you want to use that car as an explosive battering ram into another car or to create a very loud diversion.
Vehicle Fighting
- One person drives, and ideally, the second person navigates and communicates. If the driver looks at the map for one second too long, he's going to go into a tree. Under combat, the driver will have problems multi-tasking trying not to die. Open up your map and set a marker. Try to drive away from danger areas. If you are going into a danger area, park away or you will alert everyone nearby.
- If your vehicle is flipped over, throw a grenade near it, and the vehicle may flip back over with 33% damage.
- If you are driving into the zone, and you are far away, and you see some vehicles on the road, shoot out 1-2 tires. A car with all 4 tires blown out is near useless. Anyone left behind will have a high risk of being "zoned out."
- Some people have stayed inside a flipped car and used it as camoflauge. The enemy will completely ignore the flipped car and keep going. This is even better if you've flipped your car on top of a large bush.
- If you are getting shot at, it is pretty pointless to fire back unless you are really close to the enemy. Your gun has next to no accuracy. It is a waste of ammo. At this range, it's better to either book it forward, or mildly swirve left and right. At the same time, the passengers should smoke behind. If one of your teammates is downed, you can drive back, and you'll have SOME cover, thus increasing your chances of living.
- If the car is on fire, it is about to explode, and everyone inside or near the car is about to die.
- If you crash into another car, the results are random. My team T-boned another car, and we ended up being downed. Expect nothing. Another team brake-checked the enemy car and the enemy ended up flipping his car. In another instance, your car can get stuck on the enemy's car, you both might spin in a circle shooting at each other on full auto, and then both of the cars will explode at the same time killing both teams.
- The car makes A LOT of noise. If you are driving near a suspected danger area, stop using your car. You'll end up like the guy (Sonny) below.
- To destroy a car, check the vehicle section of this guide for in-depth stats.
- Try to aim for the people in the car. It takes less bullets to down them. You might even make them turn around to get their buddies, which is absolutely suicidal.
Into the Village
Go into a village where the enemy is likely to drive in. If an enemy car is approaching a village that appears to be not raided, he will stop on the edge. That's when you open fire on the tires and the people.
Road Block
- You can use the vehicles to block the bridge or road. I highly don't recommend that you go on the suicide bridges (check Map Section).
Bait Car
You can leave a car near a road and expect people to go inside. When they've just entered the car, you can open fire.
Inside The Bait Car
You can drive your car so that the back half is in a large bush. Then you stop the car then hide in the back seat and wait for people to come in. They will drive off, and that's when you go into FPS mode and pop everyone in the back of their heads. You can also use the pan on them.
Dodging a Car
Turn left or right 90 degrees, and sprint forward. Don't press left/ right and sprint at the same time. You'll just side step slowly and die. Also, you can try to prone underneath it.
https://i.redd.it/omvpwxz8l8pz.gif
Park Away from Danger Zones
Park away from any danger zones with the car covered by a building. It should face the exit. You can also park in a garage.
Swimming
Crouch to go down. Jump to go up.
Watch your lungs. If they're near empty, go on the surface and stop sprinting to regain your air.
- You swim ~30% faster underwater.
Aquatic Fighting
- Bullets cannot penetrate any amount of water. If you are underwater, you are invincible. Don't shoot at people in the water, it's a waste of ammo. Shoot at them when they pop up for air.
- You can get in a boat occupied by the enemy. Go into First Person and shoot them. Or change seats and hit them with your pan.
- Hold shift while driving the boat to go faster (boost). You waste more fuel.
- You CAN shoot underwater BUT ONLY if you are inside a car that has crashed into the water. Once you get out, you cannot go back into the "dead car."
- You can hit people who are underwater with a grenade.
- Cars can drive underwater for a short amount of time. You can cross the thinnest northern river by going at top speed (with boost). You'll go underwater, and you'll have to drive the last 15 feet underwater. You'll make it ashore and be ok.
- You can revive people who have been downed underwater.
- You can instantly die underwater by drowning and losing all of your health.
- Take evasive maneuvers by mildly swirving left and right. Or if the situation is correct, if you are going fast enough, you can just straight book it forward.
Medical
You can move a little while moving.
When you bump into your downed buddy, you'll push him and disrupt your reviving. Both people must stop moving.
You cannot revive while prone.
When you take boost item, there will be an orange bar above your health and an icon that appears too. Those icons can be "health" or "speed" boost. There are various levels for these.
Downed Blood Draining
The more you are downed, the faster your blood drains when you are downed.
Heal And Run
If you use an item with a timer, you can start running forward at 0.5 seconds.
Stacking Pills
Pop energy drinks and painkillers before you go into combat or when you are going to be out of the zone for a bit. You'll have active healing effects. It's better than nothing. The third line in the orange booster bar above your health bar makes you run faster.
Healing
Use bandaids if you are out of combat. Use first-aids if you are in combat. Use pills and energy drinks to top off your life as soon as you can. Be sure to take cover first so you don't get blasted.
Inventory Management
Picking up Stuff
Don't look at the floor. Move on top of an item pile, press tab, quickly read the item list, and drag and drop what you want. Move on to the next pile. This should take 1-2 seconds per pile.
Keep What You Need
Try to keep your inventory at bare minimum. When you're not in combat, drop what you absolutely don't need, even if it's extra bullets. If you ever go on top of an enemy body, you need to loot as fast as possible (drag and drop). Just take all of the good stuff, figure it out later. If you're 99% full, you'll be wondering what to leave behind, a waste of time. Prepare beforehand. When you approach the end of the game, I suggest dropping a lot of your extra stuff. You don't need 400 5.56mm ammo. Probably 160 is enough. You don't need 30 Shotgun ammo. Probably 15 is enough. You don't need any pistol ammo. No one uses those pea shooters at the end.
Weight
Your weight is representated by the small white bar next to your backpack.
Splitting Items
There's a button (I set mine to 'C') you can use to split items down to the exact quantity to throw to the ground.
Item Distribution (Communism)
When you have some down time, even for a second, you should distribute the gear evenly. Just ask if anyone needs meds or ammo. Or if you have way too much of something, ask if people need it.
Shooting
Shooting
Depending on whether you are first-person or third-person, and whether you are moving or not, and whether you are holding the aim button, your spray pattern may be completely different. You need to shoot a wall to see for yourself. Or youtube this. For long distance shooting, switch your weapon to single fire. For short distances, you may want full auto. You'll have to figure out what your play style is. I like to use the aim down sight and start spraying and praying. There's little to no horizontal recoil for assault rifles in aim-down-sight. You can shoot very accurately from close range (20m) using rapid single-shot, third-person, standing still. Hold shift to hold your breath and steady your aim while aiming. Also, if the guy's head is as big as the red dot on your red dot sight, you should use single fire.
- Holding right click slows movement. Some people just run and gun at 5m or less.
- There is bullet drop. Most of the time, you will not engage beyond 200m and you only have to aim about 1-2 human heads higher.
Bob and Weave
I saw a pro-streamer lean left and right while shooting. Whenever he got shot, he would crouch down behind his hill and heal.
Training
Drop into high loot areas (danger zones) to quickly train up on the aiming mechanics and your reflexes. Combat is normally avoided in a serious game so this is the only way to train up quickly.
Grenades
Grenades can help give you more options in combat. Often times, people don't use them at all.
#OUTDATED - The timer is counting as soon as your press the left click. It's about 3 seconds.
You manually cook grenades by pressing R.
- There is no auto-switching from your grenade to gun.
Underhand Throw
Hold left click, right click, then let go of everything.
Stun Grenades
They will make an enemy blind or deaf for 7 seconds. It must land in front of them. If they face away from it then they will only go deaf.
Smoke Grenades
They last for almost a full minute. They're extremely useful for when you have to make cover right away. I highly recommend keeping these over grenades and stuns. Many times, you'll be caught out in the open so these are pretty useful.
Grenade
The grenade cooks as soon as you hold "left click." This is good for scaring people out of cover. It does high damage. You can underhand throw by holding left click then right clicking. You can throw through windows. May bounce off of window rails. Excellent for clearing out one-room shacks.
Molotovs
I almost never use these. There's a fire trail when these are midair thus revealing your exact position.
Strategy - The Big Picture
This game has a lot of applicable strategy. I will talk about some of it in this section.
Tactics are the small specific things you can do to meet some immediate goal. Strategy is the big picture plan used to obtain some final goal.
Problem Solving
"You cannot fight what you cannot see"
To solve a problem, you have to do this:
1) Identify problem.
2) Make a plan.
3) Execute plan.
Once you identify and understand the problem, you can make a set of steps to solve it, and then you execute the plan.
A lot of people will fail at step one. Let me explain
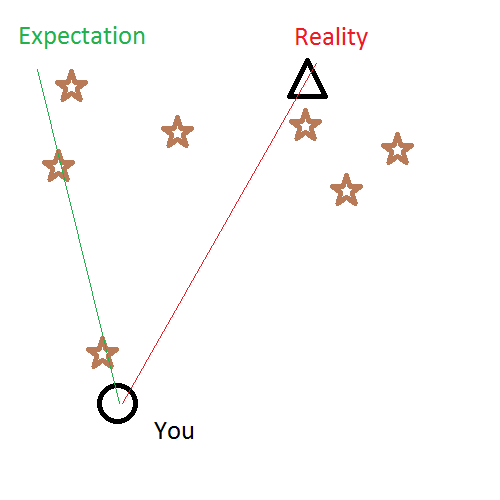
You get shot at. You immediately think the enemy is toward the green area. So you place the tree between that area and you to maximize cover. But, the enemy is in the red area, and now he's going to blast you. You didn't identify the problem correctly. This happens pretty frequently.
"Where are they shooting me from?!"
So if you can detect (identify) the enemy or even predict his expected behavior, you can make a plan to destroy him. I will talk about detection in another section.
Advantage
If two forces have no difference, then no one has the advantage. Advantage is created through some form of difference. It can be created with either the physical (guns, terrain, etc) or the mental (detected enemy, successful enemy prediction, etc). Detecting the enemy is probably the greatest advantage you can gain. If they do not know where you are at all, then they cannot do anything.
Anticipation
Also known as "Prediction, Pre-cognition, Educated Guessing, Inituition"
There are times when you can predict what the enemy would do. If you can accurately guess what the enemy will do, then you make an accurate plan to destroy them. I will explain in the later sections with examples.
Concentration / Focus
When you've located the enemy, there are opportunities to lay all fire on it when the enemy is most vulnerable. It allows you to really pin them down, cause panic, and unfocus them. Some classic examples are "hammer and anvil" and "blasting a car" (explained in Team Tactics).
Analysis Paralysis
Let's say you're hungry and you take a trip to a Burger House. You go there and you look at the menu and you see so many options. You're not sure what to choose. The line behind you is getting longer. The cashier is waiting. People are getting annoyed. Stress and anger on all sides are increasing. This is the "analysis paralysis." You've been here plenty of times. You could have decided on the way there and then when you arrive, you can just execute your plan instantly. When there is a lack of action, you can plan ahead of time.
To help with "Rapid decision making," you will have to pre-plan often. When you go to one place and you have to wait for a good few minutes, you can talk to your team and attempt to assess the future risk with the given information.
Habit and Reaction
When someone throws a rock at your face, you will, without thinking, use your hands and limbs to protect your brain bucket. This is an instinctive reaction formed from countless generations of evolution. When you get shot at in this game, you should immediately find the closest tree, cover, heal, and shoot back.
When shot, some people go prone, and continue to get shot from some unknown, unidentified direction.
If you know ahead of time when and where the shots are going to come from, you can take immediate action that has a high chance of succeeding.
Check out War Story - Taking the Hill.
Stress and Panic
Stress comes from pressure. Panic comes from too much stress.
If you've been zoned out and you have to crawl through 500m of grass to get zoned in, that's going to be pretty stressful. If at some point, you start getting shot, and you don't know where the enemy is, and you have no cover, then you'll probably start panicking. If you haven't done enough pre-planning, and something happens that you don't anticipate, then you have a higher chance of doing something strange like getting up or running like a headless chicken. You'll notice that whenever you shoot at people who are out in the open, they'll normally jump up, spin in a circle, go prone, and then die.
Fast vs Slow
When you move fast, you can gather quickly and go to where you are going, but at increased risk of getting detected and blasted. When you move slowly, you have a lower chance of getting detected and blasted.
Offense vs Defense
Whenever you blast the enemy and make a lot of noise, you may get "free stuff" at the risk of being detected. There are times when blasting the enemy would be very profitable or when you have no choice like if they're about to detect you nearby.
Erratic Decisions
There are times when you have a series of bad options to choose from. It may pay to make an erratic action that no one expects. My teammate and I drove our car into the house in the center of the zone, crashed it into the side of a one story house, and executed a "Simultanous House Entry" play, and killed everyone inside.
Zone Prediction
If the white zone is 40% in the military base, and 60% on the mainland then those are your odds of the new zone being there.
Recommended Reading
This is a bit excessive, but I recommend reading "Good Strategy, Bad Strategy." It's a good primer on basic strategy and why it works.
I also recommend "The Art of War." It's an ancient Asian text. The translation I read was a bit too wordy.
Conclusion
This may be very abstract and confusing. So read the war stories and situations section to see how it's put together.
Strategy - Detection and Evasion
In this section, I will talk about finding the enemy (directly or indirectly) and avoid them.
Even though the map is huge, you can still easily expect contact, especially when the zone gets smaller. There may be times when you cannot find an enemy directly and you really need more gear. If you can predict where the enemy is going to be, then you can. If you become predictable, you'll get blasted.
You have to use every tiny piece of information and bring it together to form a whole picture that may give you some idea of the battlefield. These tips below work both ways.
Danger Zone
Here are some areas where there are likely to be people in or nearby:
- Hill tops
- Houses
- Lots of houses
- Near an open area
- The center of the zone
- Starter Plane's Flight Path
- Gunfire
- Bridges. On and around it.
- Chokepoints like bridges.
- The package (More time = more danger)
- The package near lots of houses on top of a hill surrounded by nothing but open area in the center of the zone with non-stop gunfire coming from it and there's a bridge nearby.
If you hear any gunfire, let's say south, then you should avoid south. They have the defensive parameter set up, and you'll be at a disadvantage. If you go near these areas, slow down, and be prepared to fire. Otherwise, speed up and put your weapon down so you can gather and move faster.
If you're driving up a hill, the noise will alert the enemy. They're probably waiting until you get half way up where there's nothing but open space. Then you'll get blasted.
Flight Path
The "Gameplay - First 10 minutes" describes this in detail.
Outer Edge of Zone
People generally congregate around the outer edge of the blue zone. This is so that their rear is PROBABLY covered. Zone huggers only move along the edge of the circle. Expect them.
Outside of the Zone
Very few people will expect you to be outside of the zone. Especially, if the game is late since it does so much damage.
Shrinking Blue Zone - The Scum Scraper
When the zone shrinks, people start running towards the white zone. They'll normally stop on the outer edge of the white zone and heal any possible wounds. They normally enter houses on the edge of the zone.
Scum Catchers
These are the people who are on the edge of the white zone waiting for people who are trying to run in. Sometimes, these people are waiting in the buildings waiting to blast you.
Fat End of the Zone
It is more likely that people are in the fat end of the blue zone.
From the Danger Zone To the Zone
A lot of people are generally in a danger zone. These people will normally take a straight path to the zone.
Noise
Gunfire or vehicles will give away an enemy position from far away. Remember these areas.
Activity
For example, let's say you're zoned out and you need to cross the ocean to get to the military base. You drive up to the coast and you see two vehicles on the beach but no boats. You can probably take a guess that two enemy teams have taken two boats to the island. You can further guess that they're in the coastal towns waiting to blast you.
Shadows
Moving in the shadows will make you harder to detect compared to out in the open in the grass.
Prone in The Grass
Going motionless and prone in short grass will make you near invisible to close range people who are not on alert. It works better if you are in the shadows. You can remove your back-weapon to further reduce your visibility.
Prone + Walk
You can aim-walk, which is quieter. You can also press the walk modifier button while crawling to crawling much quieter than the loud default crawling. I highly recommend this.
Building in the Zone
If there's a building in the zone, and the zone is small, the chances of an enemy being there are normally very high.
If you combine many of these factors, you can "see" a heat map of danger and you can make an accurate plan to deal with it.
You can even "see" the flow of enemies from "high danger areas" towards the zone as they either "hug the circle" or move within low danger zones (trees, rocks, buildings). Since you expect them, you can set up an ambush, blast them by surprise, and take their stuff.
I recommend that you engage only when:
1) the enemy is about to kill you.
2) if you really need gear and killing them is not difficult.
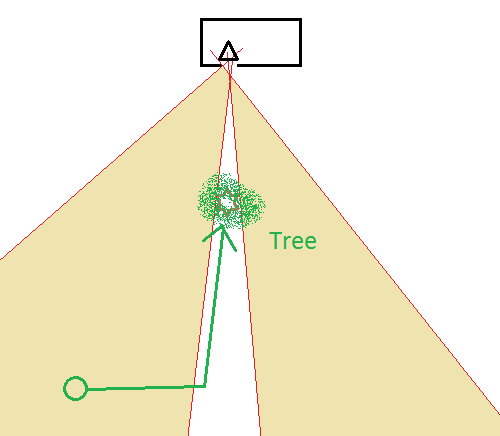
Strategy - The Mexican Standoff
I was thinking more about this game. I noticed that whenever I kept silent, I had a high chance of winning. In fact, all the games I've won was because we were able to keep silent and exercise patience until the last minute. I had this thought pop up in my mind.
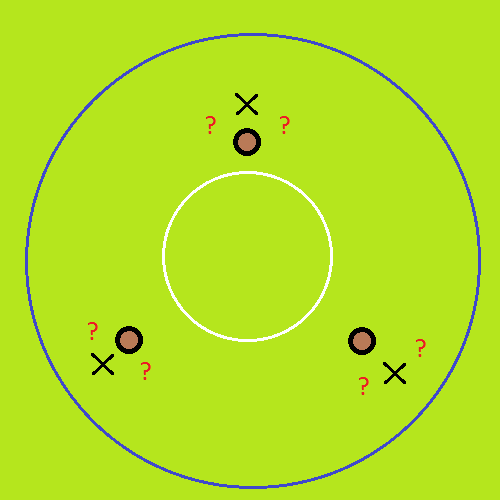
Here's a situation. Given the picture above, let's say that you're the man above. You are behind a tree (brown circle). There are 2 other people alive in the zone, also behind a tree. You have not seen nor heard the enemy. You have no exact idea where they are. They could be prone in the field of grass near their trees. The new zone is now dead in the center, out in the open. You have 90 seconds left before the blue zone closes in, and you get zoned out and take tons of damage. What would you do?
This is a complete stalemate. Assuming everyone has the same gear, the same information, the same health, the same cover, the same skills, no one has the advantage. Advantage is created through some sort of asymmetry. With the timer ticking, if you are patient enough, the enemy may do something erratic. This will create a rift in the situation that will create an advantage for you. Let me explain.
In this case, you have only a few set of actions depending on your inventory.
Maybe you can attack them?
If you have grenades, you can throw them at the trees, and risk giving away your position to two enemies. The grenaded enemy will have his position revealed too. You may shoot at a tree, give away your position, and attempt to make others panic. The enemy may fire back at you. Thus giving away his position too.
Maybe you can get into the zone quickly?
You can throw smokes at the last minute and move toward the center of the zone. People will know you're in the zone. The smoke may go away prematurely and you'll get blasted out in the open.
By doing any of these options above, you have given away your position, or the general direction of it, and you'll have 2 enemies focusing on you.
These options aren't good. But not to worry, the enemy has the same options as you. You can try to think like them, guess what their best option is, and predict what they may do.
So let's say you wait. One of the two enemies may be tempted to take one of the options above. In the best case, one of them shoots the other, the other shoots back. One of them dies.
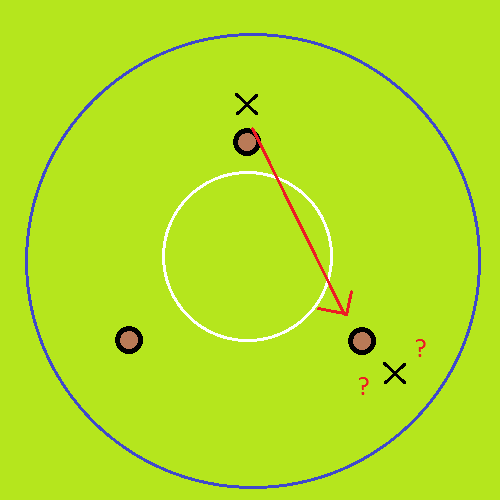
From the picture, the situation is now this:
Now, you have 1 enemy to kill, and you know the position of the other enemy. The other enemy still doesn't know where you are, has less resources, and probably less health. His level of focus will be completely all over the place. Your level of focus can be pinpointed to the enemy.
Another situation is where nobody fires at all. There's going to be a point where someone shoots another person. If you're involved in the fighting, you should have hidden yourself better.
Any amount of information you give to the enemy will give them an advantage, and it will be used against you.
From this thought experiment, we can gather that the best option would be to try to not fire and to hide as long as possible.
Ground Combat Tactics - Noise
This guide here has an in-depth noise chart.
Here's what makes noise (not limited to)
Gunfire
Driving (~120m)
Unsilenced gun fire
Sprinting
Walking
Crouch-walking
Reloading
Grenade pins
Aim walking makes a little noise
Crawling
Window Breaking
Jumping
Standing up or down.
Smoke Grenades
Here's what makes no noise.
Tapping W (No Noise)
Aiming in
Selecting your rate of fire.
If the enemy is closeby, you can attempt to move when there is more noise such as:
The enemy himself is moving
Airplane
Vehicle
Red Zone
Gun Fire
Ground Combat Tactics - Stances
Depending on your situation, you have to adapt certain stances. They come with various pros and cons. I will explain below.
Running to the Zone
You are trying to get to the zone or away from unknown fire quickly. Your gun is holstered and you are sprinting. Your ability to Defend or attack is horrible. You cannot detect the enemy with ease. Your odds of getting detected are high
Raiding - Low Danger
Sprint everywhere and get everything as fast as possible. Your gun is possibly out. You make a ton of noise and you have a high chance of being visually detected. You are not expecting any enemy contact. You and your team are spread out.
Raiding - High Danger
You move slower and you move as one team from building to building. You are expecting to take fire or hear noise. You cannot gather as fast as spreading out.
Detection Mode
You are not moving, your gun is out, and you are actively listening for vehicles and loud foot steps. You can easily see and spot the enemy. Maybe you are in a bush or prone in the shadows behind a tree or inside a "honey pot" building. Your odds of being detected are low.
Combat
Your gun is out and you are ready to blast some people. You move slowly, and possibly crouched, and from cover to cover, to avoid detection to avoid being blasted easily.
Whenever you move somewhere, you should know whether you are:
- Easily Detectable (Out in the open)
- Easy To Kill (Out in the open, no cover or concealment)
- Approaching an area of high danger.
You have to adjust your stance appropriately.
Ground Combat Tactics - 1
Staggered
If you take too much combat in a short amount of time, you may find yourself unbalanced. You'll need to reload, heal, and re-orientate yourself but you can't currently do so thus making you unready for more combat
Cover, Peek, Blast
You should always engage the enemy while you are in cover. Peek out a little bit, and destroy. If you're in extreme close range, you can even pop out completely and go full auto.
Noises
If you hear ANYTHING strange, stop moving and tell your teammates to stop moving. The keyword to react to is "shh. I hear something" or "hold up." If you hear a vehicle incoming, go prone, and you'll become invisible.
Safe Spaces
If you are in the middle of nowhere, people are probably not going to be there. The map is extremely large so people are probably going to be elsewhere. Run around and get stuff faster.
Noise Masking
Artillery, gun fire, and the airdrop plane are excellent sound covers. Same for the rain. You can run toward the enemy without any worries.
Combat Focus (Bloodlust)
During active combat, you may be unable to focus on any other task but killing. All communications by your teammate will be ignored, any other incoming stimulus is completely ignored. Your brain is shutting down any unnecessary input in order to concentrate on the very dangerous task at hand. If you need to snap a teammate back to reality, yelling their name a few times sometimes isn't enough. They are sometimes trapped in their own little world. Below is a sort of example.
Carry a Pistol
You can put an extra red dot sight on your pistol without adding any extra weight. You should drop all of your pistol ammo in the later stages. It's near useless.
Being Downed
If you're downed, you can move and drop stuff from your inventory. Maybe your teammates behind cover needs ammo or smoke. Maybe you want to drop stuff away from your body.
Baiting
Down an enemy. Watch where he goes. His buddies are highly likely to go back to him. If he doesn't know where you are, then you can wait until his buddy thinks it's safe and pops up and attempts to help him. Then you strike.
Prone to Disappear
If you go prone, as long as you don't move, people cannot see you. At very close distances, grass WILL render even if people use the lowest settings. You will not believe this until you do it. They may even bump into you and not know it!
Bush Crouching
Crouching inside a bush is one of the most effective ways to disappear. You may have to move a little out of it whenever you need to shoot. Your gun may stick out. If you prone, your legs will stick out. Believe me, this works!
Below is a classic example.
Punching Idlers
This may be a good way to increase your Kill / Death ratio. It's good for a laugh and your morale if you lose too often. Just wait until the plane auto-deploys you and everyone. You may want to get a gun before everyone drops, because there is always one idle-puncher in every game.
Holster And Run
Holstering your gun and running makes you go slightly faster.
Camera Collision
The camera has its own collison box. If you're trying to lean out of a window and find that you can't, holster your gun and punch out that window. You can now rotate that camera well out of the window now.
Talking to Buy Time
Believe it or not, people will attempt to talk to you to buy a few more seconds of life when they're downed. You can attempt to do this too. Normally, I tell a few jokes, or sing a song.
So press push to chat and say something like this "WAIT, WAIT. Before you pull the trigger and end my life. Let me make you tell you a joke." You'll end up wasting valuable seconds of their lives thus lowering their chances of survivability.
Below is are some classic examples:
Aggro
If you're being focused by the enemy, you can bait him to move to you, while your teammate is waiting for him to move.
Audio Aggro
When you fire your gun, people near you will know where you are. They may attempt to outflank you in the rear. Whenever you fire your gun, it's like an airdrop. People will know where you are and may attempt to swarm you for your gear. If the enemy knows where you are, you've lost an advantage. Or if you are long gone, they may think you're still in the old spot
Stay in Cover
If you're in combat, the guy in cover will see where you are and position himself perfectly to shoot you. He may only peek out his head and have your entire body to shoot. In cover, you can gather information without getting hit.
When To Kill
You kill when you have a high chance of winning and you draw no risk of further combat. Or because you have to. Let's say you need to absorb their powers and get their gear, or maybe you were ambushed. If you have no clear shot, don't take it. You'll end up shooting them, they'll hide behind a tree, you'll give away your position, waste ammo, and end up pinned down by the person you were shooting at (or maybe even people near you). And you'll both end up CRABBED out of the zone and die! All this from a few left clicks!.
Ground Combat Tactics - 2
Concentration
If you're out in the open where there is a hill to your left, a hill to your right, houses in front of you, and the package is behind you, you're probably going to be blasted from all 4 danger zones. You can at least get to a point where you only have 3 danger zones. Or 2. Or just 1. If you're getting blasted, that's AUDIO AGGRO, and you're going to probably attract more fire either now or later. When you have all of these danger areas to account for, you dilute your concentration and thus focus of fire power. When you get shot, you may even panic, go prone behind no cover, and get blasted either way. "WHERE ARE THEY SHOOTING FROM?"
Estimating Range
On your mini map, one small square is 100m, one big square is 1000m (1km or 1 click.). You can use your mini-map to get an accurate estimation of your enemy and re-adjust your weapon, if needed.
House Camping
Houses are fortresses. If you are in a house, you may be trapped inside. People may be covering your entrances. Check out the MOUT section for more information.
Kill Feed
During the beginning of this game, this feed is sort of useless, and it's "too much info." Towards the end of the match, this will provide you with possibly crucial information about the enemy. Check out the kill field to see what your enemies have. If you know they have an AWM, you can probably guess that this guy has 10 medkits, a ghillie suit, an M249 Saw, 10 grenades, Level 3 everything, etc. You should probably take evasive measures when the zone gets smaller.
PUBG Shuffle
When you have to pick up stuff, people normally do the pee-pee dance. This is where you walk back and forth, side-to-side erratically. This is so that people who watching you don't pop you in the head at ease. Of course, if you're out in the open, nothing will save you anyways. If you're looting a body, and you know that there aren't many places where people can snipe you nearby, you should just go prone and pick up the stuff. Or even use smoke.
Prone Camera
When in prone, you can't aim above or below a certain amount. Check your aim to see if you can aim to certain areas. If you don't like it, shift.
Hug/ Skirt the Zone
Moving around the edge of the zone is pretty safe. Most people are already somewhat deep into the zone. Also, your flanks are covered.
Starting Plane's Flight Path
Take note that people congregate in areas near the plane's flight path. People are near the line of the plane's flight path, and most people drop out as soon as they can, and in high building areas. Take note of this as the game drags on. If you are moving far away from the plane's flight path, there is probably no one around. Thus, you can raid faster.
Letting Other People Kill Each Other
The saying goes, "Second mouse gets the cheese." If you see two groups of people fighting each other, you can just wait until they kill each other. When the last group has taken and gathered the enemy's supplies, then you kill them and take everyone's stuff.
Dealing with Covered People
If you can, throw a grenade at them. They'll run out. Shoot to kill.
Listen To Gunfire
If you hear someone shooting slowly, then they're fighting someone from far range. If they're firing rapidly, they're probably shooting a close range target.
Shadows
If you crawl in the shadows, it'll provide more camouflage.
Scope Switching
During the last few minutes of the game, the zone will be very small and an 8x scope might be worthless. If you had a red dot sight on your pistol (takes up no weight), now may be the time to switch out those scopes.
Tree Hugging
Trees may be the only source of cover when the zone closes down. Get behind one, gather info or lean and shoot. It may be disadvantageous to go prone behind a tree since your body may stick out just enough for the enemy to shoot your foot a couple of times.
Leaving People Alive
You don't have to shoot everyone. If you keep tabs on their location, let's say they're in a building, you now know where 1 enemy is. You can even get clever and bait others to kill them. You can shoot the enemy's building's windows with a suppressed weapon thus diverting the enemy's attention to that building. Now you can either wait until they fight each other and weaken each other. Then you strike when they're looting each other. Or, you can peel off if you're not strong enough.
Stealth - Visual and Audio
This game heavily relies on stealth. Whenever you shoot an unsilenced, you take a huge risk at giving away your position. If you're in a small zone, the people will definitely know where you are. You're created AUDIO AGGRO and people may close in to to blast you. If you have a silenced weapon, I highly recommend to shoot at will. The enemy being fired at will be very confused and may even panic by running out in the open for your shooting pleasure.
How Much Ammo To Carry
I personally think 200 rifle ammo is more than enough. Toward the later stages of the game, I recommend that you drop excessive secondary ammo and things you aren't going to use. When your inventory is somewhat empty, you can rapidly pick up stuff if you have to without doing the inventory juggling.
Bullet Penetration
There is none for now. Your bullets won't go through cars, doors, windows, the window bars, etc. If you think you can shoot through the door, you are actually shooting the hole of the door you've created.
Taunting
It feels good to taunt the dead enemy. This is very noisy and unnecessary. I taunt the enemy when I know I'm in a safe space. One teammate can create noise while the other moves in.
Shoulder Camera Reset
If your camera is in your right shoulder, and you then you switch to your left shoulder. It will stick there until you change it. This may throw you off if you don't sight in for a while. By default, keep it to one side when you're no longer in combat. If you don't, you might have a second to blast the enemy, so you sight in and you think you're going to be looking over your right shoulder, but it goes to your left shoulder instead. The camera looks all funny. You are confused for half a second and that's enough to get you blasted.
Suppressor
If you use a suppressed gun, the enemy will have absolutely no clue where you are. I encourage firing at will.
Patience
Patience plays a lot into this game. Check out the strategy section for a detailed example on it.
Ground Combat Tactics - 3
Shooting Proned People
If you shoot at a person, they may try to go prone. They will disappear in the grass. If you shoot the grass of where they might be prone, even though you can't see anything, you might end up killing them. If you see blood, shoot that blood. If you are getting shot, I suggest moving to the side since they'll probably continue to shoot exactly where you went down.
Remember the Airplane Flight Path
You can estimate future danger by remembering the flight path and by guessing how many people dropped here. Check out the "Gameplay - First 10 minutes" section on the flight path.
High Ground
Taking the high ground is a classic strategy. It is hard to go up there. You can see everything below. Anyone on the low ground would be in trouble.
Breaking Off and Running Away
If you are getting shot at from behind, while you are running, you can look behind (using Alt), and attempt to block the enemy's field of fire with trees and bushes. Adjust your running path accordingly.
Petty Death Talk
When you die, you can still talk. You can start screaming "THE ENEMY IS HERE. COME HERE." I did this to the guy who killed me, and it got him killed. It's really petty, but it's good for a laugh.
Loot Boxes
Some loot boxes may have a some good leftover stuff. Some people cannot take everything or don't need anymore 7.62mm.
Crouch Below the Top of The Hill
You can look at the floor and see over the hill without any risk of being detected. Stand up to shoot, crouch down to become safe.
Run Behind the Hill
Don't go on the top of the hill. Run just below the top so you don't expose yourself to both sides of the hill.
Weapons: Main 1, Secondary 2
Keep your long range weapon on 1 and your medium range weapon on 2. Or flip it, if you want. Force this to become a habit and organize yourself so you remain consistent. I normally keep my shotgun on 2 and my rifle on 1. So when the time comes, there is no confusion as to what is what.
Wack-a-mole; Stand to Shoot, Crouch to Hide
You go behind a hill. You stand up to shoot or get ready to shoot. When you are hit, you just crouch to hide behind the hill to hide and heal. You move a little bit from your original position and repeat. This is a good tactic if you have no trees.
Wound and Rush
Once you wound an enemy and they go behind cover (to heal), then you can rush, or shift your position. They'll still think you're in the old position. They are none the wiser.
Military Operations Urban Terrain (MOUT)
This section will cover anything related to buildings.
Clearing out a village is extremely dangerous. You'll need every tiny advantage you can get.
The reason why it's so dangerous is that the enemy can literally be everywhere, listening to you move. He can hear you stomping around the 2nd floor, or running outside in the grass, or closing the door that's 3 doors down the hallway to the left. He might even put a first aid kit and a bunch of bandages in around the corner to bait you. When you go to pick it up, rummaging through your inventory, which is 99% full, that momentary lapse of concentration is all you need to get blasted.
One man in a building can easily blast an entire squad.
During a building clearing, the vicim will have failed to have adequate cover, or even failed to clear out all the rooms. The enemy might even be behind a door that you failed to check. There might even be 4 of them in the bathtub waiting for you to open the door, and blast you.
You have to check corners, the top, the bottom, the window, every floor, behind every door, inside the tub, everywhere.
When you approach a village, you have to make sure you don't drive up to it, making all manners of noise. If you do, the enemy squad is covering all the corners or entrances, and you're going to get blasted.
Normally, villages with closed doors are normally empty. If the zone is large, and there is good loot on the ground, chances are good that the place is safe, and you can loot it quickly. Still, have your shotty out like John Gotti.
If you're next to the building, you can listen for footsteps. Footsteps are extremely loud.
If you know where they are, and they know where you are, and you really need to clear the building, you're going to have to spread out. If you all go down one hallway, you're all going to get blasted.
You can throw grenades inside. Grenades are cooking when the moment you hold that left click. Grenades will break UNBARRED, unbroken windows. If you see that it doesn't, the server will probably "sync up" to the grenade going into the room.
You may need to use stun grenades. Being hit with a stun grenade will make you blind and deaf, and therefore useless, for approximately 7-8 seconds.
If you're in a building, and people know your position, you're going to be trapped like a rat. They're probably throwing grenades in every corner and covering every avenue of exit (doors, stairs, balcony). You may have to run out before this happens.
Use the tactics below if needed.
Open Doors On Buildings
If you are going into a town and the doors are open, then the buildings have been 95% raided. It is mostly pointless to see if there is still stuff there. There might even be people still there.
Corner Camp
You have to corner camp hallways or small rooms, and basically funnel people to their deaths like that movie 300 and the hot gates. This is the key to MOUT Defense.
Clearing Crazy Corners
The camera is a mess in very close quarters. At times, your own body may be between the enemy and the camera. Sometimes, you'll have no choice but to use the first person mode to even hit anything.
Doors
Doors are fragile and can get blasted with bullets and grenades. Bullets cannot go through the door, but it can create holes.
Close Your Doors
If you close all of the doors in your village, the enemy may arrive to your village thinking that it hasn't been raided. Their guard will be completely down. Opening doors is extremely dangerous. It is very loud and if the enemy opens one, it'll give away their position.
Windows
Windows are tricky beasts. If you shoot too low, your bullets will hit the wall below the window even though you are aiming clearly outside. Some windows have railing. You cannot shoot through these. You'll probably end up shooting these if you're not aware. Be aware where your barrel is (by guessing). You may have to stand and take a step back to get a clear visual and a clear line of sight. Windows will absorb one bullet completely. There is no bullet penetration. If a window is blown out, people may be shooting at it or out of it.
Bleeding Through
In some structures, your body may "phase through" the wall if you're too close to the wall. A body part may go through the building, and the enemy may shoot at it.
Honey Trap
Set out some items in the living room. Seeing valuable items that haven't been picked up will cause the enemy to lower their guard. If there's alot of valuables then they will stumble through their inventory to see what they don't need. That's when you cover/ peek/ blast him. They may move in a non-alert fashion thinking that no one is there since there's this amazing loot on the floor. Close all of the doors, and loot his body in safety.
Exiting
Be aware of gunfire. Other houses may be dangerous. Draw out the danger zones in your mind and exfiltrate away from them. You may have to avoid doors and instead jump off of the roof or balcony. You can even loudly punch out of a window and crouch-jump out of it if you are desperate. They may not expect this. Dropping from the third person may cause a small amount of damage. Try to land on something higher.
Approaching A Building
You should be aware that if you're running out of the open towards any building, there might be a guy waiting to blast you from ANY of the windows.
In this picture, our faithful warrior attempts to run in this manner to block the enemy's effective field of fire as soon as possible.
Check Outside
Don't forget to check the balconies for enemies and loot.
Climb Out of Windows
Hold up (sprint or not) and press jump. Going through glass panes makes a lot of noise.
Team Combat - Tactics
This section will have tactics relevant to team games. Don't group up with strangers. No one wants to play with them for a reason.
When you join a game with a duo, you'll be fighting up to 50 pairs. When you join a 4-man squad, you will fight up to 25 squads.
Teamwork makes the dream work. Good teamwork is broken down like this:
Skill -> Will -> Teamwork
Each individual must be competent or else one will die quickly. If the person is new to the game, they must read this guide, die a few times, read this guide again and say to themselves "Damn it. I should have done XYZ." Just play the game.
As for willpower, you must say to yourself, through self-affirmation, as cheesy as this sounds, "yes i can." Even though, the new zone puts your team out of the zone, and you'll have to run through 200m of open field full of snipers, you shouldn't say on the chat, "We lost." That's loser talk. You say "We have to crawl through 200m of open field." It's better than absolute demoralization, which will cause people to shut down completely or GO RAMBO.
Total demoralization can cause a person to act abnormally. It may be caused by: the death of a teammate, or maybe you're getting shot at from everywhere. The effects of demoralization can be:
- Disconnecting from the game.
- Going rambo. Banzai. Suicide Charge. They may charge in alone.
This is what happens when you go in alone into a building.
If the team has the skill to kill and the will to win, all you have to do to put it together, is to use communication. Communication is the key to teamwork. Without communication, the teamwork is just a bunch of individuals moving without coordination. Imagine a centipede that has legs that don't move in sync. The more people you have on a team, the more coordination you will need to control the chaos.
"1 + 1 = 3"
Plese don't just charge in without support. You'll end up on all fours giving up that booty like some punk.
Capabilities
Your team should know your team's capabilities. If nobody has a sniper rifle, you should probably avoid long range combat. If you have no ammo, don't engage in long range combat. If you have no close range guns, avoid close range combat. If you have no meds, combat is probably not advisable. If you ignore this, then you're probably desperate.
Inventory Distribution
Supplies must be distributed evenly or justly whenever there is downtime, or when possible. It doesn't make sense for one teammate to have all of the 5.56mm or meds when another team could use that now or later. If your teammate says he needs ammo, even if you're running, you can say "I'm dropping 5.56mm." Drop it. Your teammate can pick it up while running.
Pinning Down
If an enemy team is far-away and out in the open, you can shoot at them a few times from behind a tree. You can bet that those guys aren't going to be moving for a minute. A wasted minute that could have been moved to get closer to the zone or gather supplies.
Distance
Your teammates should be close to each other for support. Don't get divided and conquered. If your teammate is ahead of you by a lot, they're not going to look behind to check you. They normally assume you're right behind them. But for the 10% of the time you aren't, you have to talk to them. Just tell them "Slow down" or "you're too far" or "wait up." Also if you are too close, you may bunch up and all get blasted by one grenade. Or the first person might run back out of the door but the second person is blocking him. Then he gets blasted.
Teammate Awareness
This game will make you 110% paranoid. Even hearing a thunderbolt will make you go prone. So make sure that you message your teammate if you enter the same building as him or you're going to be blasted.
Downed Enemy
If the enemy is downed, that means at least one of their teammates are alive. You can bet that their teammates are nearby and waiting for you to show up. Just wait to bait. You should be careful not to kill him immediately since his friend might rush you and you'll need to reload. The downed enemy may even attempt to crawl to their teammate's general direction thus giving you clues to their whereabouts.
Killing a Downed Enemy
If an enemy team has enough dead teammates, they may attempt to rush at you in order to end the game quickly so that they can play with their teammates. When an enemy teammate is killed, he can still observe his dead body and feed information back to his teammates. Be aware. I recommend killing the downed enemy if you know where the other enemies are and if you are safe.
Wait Before Moving
The team has to stick together or they'll become divided and conquered.
Downed, Lost Cause
If you know you are finished due to the zone, just say "LEAVE ME." Your teammates should just run into the zone and attempt to win for everyone.
Crippling a Team
Downing one person who is attempting to make it to the zone may make his teammates stop, turn around, and help his teammates. They may not have enough medical supplies to make it or waste precious time trying to get further into the zone.
A classic example of BAITING and BLOODLUST
Team Vision
What is everyone covering? Check the map and you can see what direction everyone is facing.
Who is the Sniper?
Whenever I play, whoever finds the sniper rifle first has been chosen by the RNG gods. The whole team will give this player all of the SR attachments and scopes found. You can also give the sniper rifle to the best shooter.
Clearing A House
You can either go in at the same time and you might get funneled into a hallway. The first guy may get blasted and try to go backwards while the second guy is trying to advance. Thus you two block each other, and for a moment, you both are not moving. That's when you get blasted. OR you can go in through different doors and end up blasting each other. This second technique requires coordination and communication so you don't end up blasting each other or blocking each other.
Spread and Loot
If the area is assessed not to be dangerous, your team can spread out and quickly raid every house.
Leadership
Normally there's a leader and followers. This makes decision making much easier since a debate can be a waste of time. There can be debates in safe zones.
Team Bonding
Play with the same people. it takes time to build those synergy levels.
Team Combat - Communication
Communication is the glue to teamwork. You have to trade to-the-point, accurate information so that everyone is on the same page.
The team should be on the same page on everything. Strategy, tactics, lingo, and plays.
Avoid being confusing, ambiguous, or vague. You can even open the map and mark it for your teammates.
Say and React
If you're getting blasted, you should say something like "straight, left, far," your teammates can instantly react. Or even just "Left" is enough, assuming your teammate is moving straight to some direction. Saying "Left/ Right/ Straight-Left/ Straight-Right" is much better than saying "east or 230." People may not be completely orientated to face east quickly 100% of the time. The team should know where "straight" is before moving forward. It's normally a pre-marked point on the map. Don't say "over there." It's vague. And don't scream it a hundred times.
Using the Compass
Look in the direction of where you are getting blasted, if you can. Look at the compass and say that number. This action should take 1 second.
For example:
Bad example:
Baddie: Enemy east tower.
Me: Where? I don't see him next to the tower. Left or right of it?
*gets blasted*
Good example:
Goodie: Enemy, east, very close behind the wall. 290!
*blasts enemy*
Here's an example of this in action.
Non-Verbal Communication
Sometimes, you can assume your teammates will do things. If they don't do what you expect, things go bad. Let's say you're pinned down and taking fire close by out of nowhere. You expect your teammate to come to you immediately without saying anything. These things are obvious. Sometimes they aren't. Let's say you say "rush the one guy." You run left. You expect your teammate to run left, but maybe he thinks you mean to do a "pincer" so he runs right. If you think he's behind you and you get blasted, he may not reach you in time and you may die.
If your lead teammate is downed from an enemy really close by, he should face towards the enemy. You can immediately know that the enemy is really close from the gunfire. He could also scream "there"."
Panic Talk
If something is getting messed up, don't repeat things over and over again. I heard you the first 100 times. Just say things once loudly. The teammate should say "ok" or "roger" to acknowledge that he heard you and wasn't consumed in bloodlust.
Example here. Skip to 0:26
Get Feedback
When you tell your teammate something, he may not be listening. Maybe he is concentrating on not dying. He is experiencing "tunnel vision." You may need to hear an "ok" from him to know that he's listening.
Alert Your Team. Be Descriptive
When you have to alert your team of the enemy presence or vehicle movement or the air drop, use the compass above and say something like "Enemy, at 75, 200m." I had a teammate that said, "Enemy in the big house in front of me." I was focusing at the wrong big house and got blasted. If your enemy is moving forward, you can just say "enemy left/ right." If you're in a defensive position, you can talk to your team to make on-the-spot call outs like "front door, side door, blue house." You can even use the marker. Face the direction of where you need to mark, open the mark, and draw a line from where you are pointing. You can also say "west, enemy, far." Don't be confusing. If you say "left" and everyone is looking in every some other direction, you will confuse your teammates.
SHH
"SHH" is the magic word for everyone to stop talking, and listen in on possible enemy activity. Any amount of information on enemy movement toward your position is critical.
The Dead Don't Talk
If you're dead, stop talking. The person sees and hears what you see and hear. It is really distracting. In lower-ranked CSGO games, the dead talk frequently and disrupt the concentration of their teammates. If you want to say something, save it until the end of the game.
Clean Comms
Don't talk for no reason unless you're safe. It is very distracting.
Instant Action, Survival Reaction
When an enemy is really close, scream "enemy danger close." Those 3 words should prompt everyone to automatically switch to their close combat weapon and sets their "enemy search zone" to 10 meters or less.
Point and Scream
You can face the direction of interest and scream "pointing." Such as "enemy close, pointing." I was able to use that information to easily blast two people and revive my friend. You can visually see where he is pointing or you can look at the minimap.
Team Combat - Formations
In this section we talk about formations the players can take to maximize firepower and prevent friendly fire.
When you are behind your teammate, you risk shooting him. You should be slightly staggered.
Firing Squad Formation
The lead person is in crouch. The person behind is standing up and can shoot over the crouched leader.
Snake Formation
One person leads, and the other person follows the same exact path as the lead person. When the person gets down, the other person does not go down immdeiately He gets down where the first person got down.
Bunching
Be careful not to move to close to each other. The leader might have to backpedal and you might block his exit trying to move forward. You'll both end up getting blasted.
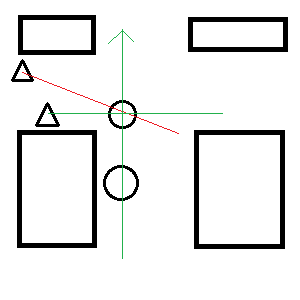
Here, the leader gets blasted. You're still moving forward so you bunch into him. You block him from moving backwards, so he gets killed. Then you now have to fight two enemies and end up getting blasted.
Squad - Follow The Leader
Try not to stay in the same tree behind the leader. Several people cannot hide behind a tree properly. Move to another tree, or bush or go prone behind the leader.
Squad - USMC Fire Team (4 man) Formations
The US Marine Corps has their own list of fireteam formations. You'll find that you can't do most of these since the terrain is often times odd. Here's a link for your interest though. (link[www.bu.edu])
Team Combat - Playbook
In this section, I will talk about a standard set of plays you can use to complete some common task.
Hammer and Anvil
Also known as "fix and flank." One person takes aggro or pins down the enemy. The other person swings around and blasts him while he is distracted. Watch out for additional enemies.
Cover and Nade
The enemy is trapped in a small building. One player covers the enemy. The other person throws a grenade through a window. The first person waits to blast the people coming out of the room.
Doorblast and Nade
The enemy is trapped in an unescapable room. One player blasts a hole in the door. The other player throws a grenade through that hole. Or a stun.
1 - 2 Story
One guy is on the top floor. The other guy is in a room on the bottom floor. The top guy may alert the enemy to his presence. The enemy will move to engage him believing that everyone is up there in the high ground. While the enemy is focusing on your friend, the guy from the bottom floor comes up and blasts everyone from the behind.
Suppression Fire
If one of your teammates is getting fired upon and is pinned down by a guy behind cover, another teammate can shoot the cover that the enemy is behind. This may stop the enemy from getting out of cover and shooting your teammate. Your teammate can then move out of danger or fire back with ease. My downed teammate was taking fire from the enemy, so I shot near the enemy to prevent his death. The enemy immediately stopped firing while my downed teammate was able to get adequate cover. My other teammates swung around and killed the enemy.
Gameplay - Spawn Island
This section will talk about the spawn island, waiting room.
I recommend that you try out every gun on the picnic tables. Shoot people or the containers to check out the spray pattern.
This game is not combat heavy and this is a rare opportunity to try out these rare guns.
This game has different aiming mechanics and spray patterns for different guns. Try shooting when you're:
- Moving or not
- Standing, crouch, prone
- Third person hip fire, third person aiming, first person
- Combination of the above.
Human Centipede
You can attempt to distract everyone from practicing by screaming "Human Centipede" and then crawling in a circle around the middle. Many people will join your human centipede and lose focus of the task at hand.
Gameplay - First 10 Minutes
Your team should agree to choose a place that has good rewards without getting into a fight. The plane's path is random so you'll all have to make a decision quickly. Here are some things to keep in mind.
- The farther from the center, the less likely you'll be fighting.
- The farther from the center, the more likely you'll need a vehicle.
- The less you fight, the more you can gather.
- The more you gather, the higher chance that you'll have less problems.
- The high reward areas (lots of buildings) will most likely have people.
- A lot of people drop as soon as possible.
- The farther away from the plane's flight path you go, the less likely you are to meet people.
- The longer you wait in the plane, the less likely you are to meet people.
After you take all of these variables into account, make a marker on the map and ask your team if this sounds good. If they say it's good, drop out when you are perpendicular to it with regard to the flight path.
You can also see inside the plane in FPS mode or look inside from third-person view.
In parachute mode, you can:
- You can go straight down by looking toward the ground and pressing forward.
- If you keep your speed at roughly 40 km, you can maximize your distance from the plane. You can do this by moving back and forth as needed. You can further maximize your distance by opening your parachute early. You'll be able to go 1.5 - 2 km.
- You can "walk back" to stop moving forward.
Here's an example of "danger zone" map.
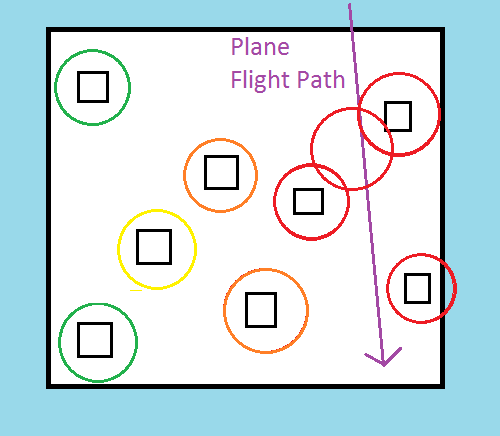
Before you land, take a note of how many parachutes have popped up and where. Use alt to swivel your head around. Take note of these danger zones or even take advantage of them and stalk the enemy.
After you land, you should try to avoid combat or else you'll waste a lot of time without knowing it. Or you might get good loot from them. Also, depending on your distance from the zone, you'll have to change your behavior.
Distance from zone:
1 km - You are ok.
2 km - Leave early
3 km - You better have a vehicle
3+ km - Spread out and find a vehicle immediately.
After you are done cleaning out the town, move to the next set of buildings. If you are far away, get a vehicle quickly (check "The island" section).
When you move into the zone, if you move into the center, you maximize your chances of minimizing your future movement.
You should keep in mind that people are generally not in the edge of the zone. They're in the nougat center. If you move around the edge of the zone, you minimize your chances of combat by taking a higher risk of being "zoned out."
Plan your movements. "Where do we go next?" As long as you don't get "zoned out," you won't have to run out in the open field getting shot by teams of snipers expecting people to run in.
Gameplay - Decision Making Process
You and your team will normally move from one checkpoint, think a little, move to another checkpoint, repeat. Maybe some combat is sprinkled in.
Above all else though, you have to take the zone into account first. The zone will kill you. Then you think about the enemy and assess risk on the entire battlefield.
Before you move, you generally ask "Where do I go?"
People normally move to another compound, because they normally need more stuff.
You can decide to take more risk for more reward or find some enemies to kill. Or you can avoid detection until you're more ready.
As long as everyone has some meds and has a rifle with some scopes, you'll have a good possibility of winning. If you all have pistols, then you're all going to die to some ghillie man.
If you have everything you need or there are no more compounds or the zone is too small, then you'll have to try to get into a better position to maximize your chances of getting the drop on the enemy, or maximize your chance of not being zoned out or maximize your chances of detecting and/ or killing the enemy.
I normally wait until everyone kills most of each other. Then I'll engage in combat moving from cover to cover.
If you have a suppressed weapon, then I suggest you open fire if you can kill them.
Gameplay - Last 10 Minutes
Crawl up to where you are going.
Either
1) Go in a bush and crouch and don't move
2) Go behind a tree and don't move. I believe that going prone may expose your feet to unnecessary fire, so stand up.
3) Go prone in some grass and don't move.
4) Go inside a building and don't move (People will guess that there's probably someone there)
Then you hope to god that the enemy gets "zoned out" and everyone kills each other. People at this point can be assumed to have "all the gear." I recommend you go into the zone and just camp. The enemy HAS to go to you.
You might have to do SCOPE SWITCHING at this range. If you have one, take the red dot from your pistol and put it in your rifle. Remember that grass is rendered in this small zone.
Sometimes you may get "zoned out," and you may have to move toward these people, hopefully by crawling. You can use smoke to even the odds. You will probably get shot by a sniper from behind a tree.
You can also randomly throw cooked grenades. If the zone is small enough, you might hit someone. This actually worked for me in one game. I make sure that I save one grenade for the last guy when I know his position.
It is what it is.
I should note that at the end, the zone will disappear completely and it'll be 100% blue gas.
In this case, your health will go down rapidly. In one case, two people were clearing out a maze of shipping containers. They were wondering where the last guy was. He was on the top. With no way up there, the two had no choice but to die. They were outplayed.
On another case, the zone ended up in the ocean, and with no way to fight while swimming, they did nothing but wait, and pray that they could stay in the center for as long as possible.
If you win, you have to SCREAM AT THE TOP OF YOUR LUNGS AUTISTICALLY AND INCOHERENTLY.
War Story - Variety Hour
This section will cover some of my personal experiences in this game. These stories will condense many intense, successful decision-points in a quick readable format. I will show you where the enemy went wrong, and where we went right.
I will capitalize words that mention guide-related tactics.
Last Words
My friend, Falken, and I heard a motorcycle incoming up to the top of the the hill we were on (DANGER ZONE). So we pointed our guns toward the motorcycle and open fired. We got the passenger while the buddy went forward. The downed guy crawled toward us and started TALKING. He said, "Wait, wait. Let me tell you a story about two a-holes who shot two guys on a motorcycle just trying to get to the other side of the hill." At that moment, the other guy popped up over the hill and started shooting at us. Luckily, he was terrible, so we killed him and they both died.
Loud Crawling
My friend, Firemagzzm and I heard someone crawling on the west side of the wall of the house we were in. That guy was crawling for 1 second making NOISES. I said to my buddy, "SHH." He made a little bit more noise. It was enough to identify his exact location. We went out of the balcony, the opposite direction from where he was. We aim-walked to the wall up north. We threw a grenade to his position. It exploded. He freaked out and started running unknowingly toward us. We side-stepped right once. My friend was crouched and I was standing. We open fired like it was the civil war and he went down like Scarface.
Taking on the SAW
My buddy, Firemagzz, and I went to a village quietly. We saw enemies in the big house near us, so we went to the opposite side quietly. We knew that engaging them inside their house would be suicidal with the equipment that we had. We waited inside on of the houses, waiting for them to leave, or waiting for some new-zone information. After sometime, a motorcycle came. They got blasted from the big house's balcony. We planned to use that dead body as BAIT and then charge them. They weren't going for it. Just then an airplane was going past us and MASKED OUR NOISE and we rushed that house by using other houses as cover. We were on the corner waiting that body. One guy was looting that body so we shot him. At that moment, we just blasted by a guy on the second floor. I downed him with a lucky head shot. The other guy ran back into the house to try to save his friend. With 2 v 1, we went into the house and guarded the stairs up, thus, BAITING. That guy came to us, because we left him with no options, and he got blasted. We ended up with a M249 and so much loot.
Getting Blasted
We exfiltrated out of that big house from "Taking on the SAW." We went on to a hill and we SKIRTED THE ZONE. We were slowly moving up the hill when all of the sudden, my friend got blasted. I got down.
Me: Where?!
Him: That bush next to me!
I didn't see anything in that bush, but I got up and blasted it with my SAW. Something died instantly. When I revived my friend, we got got blasted from where we came from. We drew AUDIO AGGRO. The enemy knew we were probably wounded, staggered, confused, not ready, and therefore, vulnerable, and so they rushed us, surprised us, and killed us both.
Humanvegetable the Precog
My friend and I went into a town far away from flight path and in the middle of nowhere. All the outside doors were closed. We assessed this place as "low risk." We split up to raid faster. I opened the first house and the bathroom door was open. I said "someone was here." I checked another house and I saw another bathroom door that was open. "They're still here! They're in..." I pointed at the largest building. "That building, on the second floor, looking down at the stairs!" We moved slowly (aim-walking) into the building. We got closer to the stairs, and then rushed it. There were people there and we blasted both of them.
I did not see these people, I did not hear these people. But, they left a few doors open that were completely out of place.
War Story - Winning Solo
After writing this guide, I had to play solo. I won on the first attempt. I will talk about my decision making process.
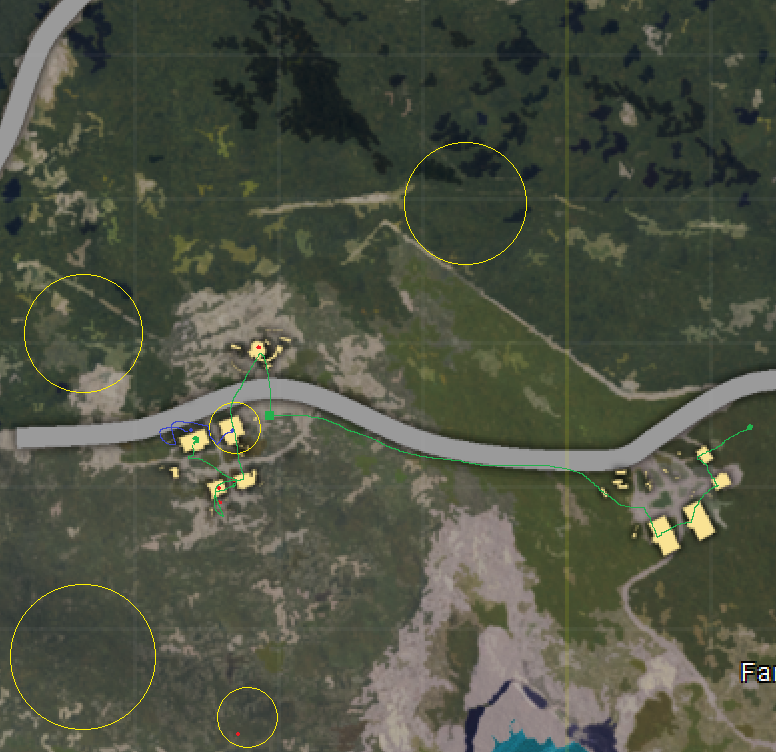
In the map, I started in the east village.
Green dot - me.
Green line - my path.
Red dot - A dead enemy I've killed
Blue dot - last enemy
Blue line - last enemy's path.
Yellow Circle - Gunfire, danger zone, enemy presence.
In the initial drop, I waited until the plane went some distance. I dropped in a small village that was about 600m perpendicular to the flight path. The village had a pistol and an UMP. The zone revealed itself. I took a vehicle to the next village west into the zone. I parked the vehicle near the road to trick the enemy that it was a spawned vehicle and that no one is in the village. I entered the bunker up north, and closed the door behind me. A few minutes later, someone was MAKING NOISE and entered my building. Using cover/peek/destory, he got blasted. I said on voice chat "thanks for the free stuff." He had a pump shotgun, which I took.
I went down south to raid the rest of the village. I closed every house's outside doors to fool the enemy into thinking that the area is unraided. It'll drop their guards. I raided 3 houses, and had to stay in the third south-western house. There was a vehicle that approached the north-eastern house. There was some gunfire. I checked the kill feed and nothing popped up. I assumed that there were 2 enemies in the north-eastern house. I stayed quiet and AIM-WALKED on the second floor of the house to mitigate noise. I had an AK and some bullets.
A vehicle drove up to the southern part of my house, he stopped, and went behind the half-wall. It wasn't even complete cover. I shot out the window and used FPS and shot at him accurately with controlled single fire. It was early in the game, so I guessed that everyone was heavily scattered. On the south side, was nothing but open field. Out west was a high, but it was far away from the starting flight path. I made a guess that it was safe. I went outside, went prone and checked his body. I got a ton of new equipment and ammo including an AK silencer which was absolutely critical to my victory.
I went back into the house, closing all the outside doors. I went upstairs and punched out all of the windows so I can lean my camera outside further around corners and I can shoot out of the windows without giving away my position. I left the upstairs indoor doors open so that I can rapidly blast people.
A care package dropped 50m south of me. I punched out all of the southern windows while it was still early and no one was around. I did this so I can get a clear shot of people and so that the window doesn't break when there are people around thus making noise.
Throughout the game, I heard gunfire in the yellow circles in the map. The zone kept closing in on the village I was in. A good sign from the Random Number Generator (RNG) gods.
I saw a guy outside south 200m+ in the field running out in the open. I took the shot since I had 200 7.62 ammo. I ended up blasting him.
The zone closed in further on my village and my house.
Another guy came into my house. He was MAKING NOISE and opening all the doors. I waited upstairs. I cover/peek/blasted him. I used FPS mode since third-person combat in enclosed spaces is difficult due to the possible camera collision problems. He didn't fire a single round. He had even better equipment. I took his level 3 backpack. I had the urge to taunt him, but at this point, the enemy is everywhere and they're listening. The man also had 5 medkits, 6 grenades, 3 energy drinks, 3 pain pills. I had no space. So I dropped some unnecessary ammo (primary, most of my secondary, all pistol ammo) and loaded up on the grenades and meds. I was thinking that the situation could possibly devolve into a building fight in the future.
A guy was MAKING NOISE out east of my building in the grass. Once he took cover, I positioned myself so I didn't shoot the window railing (check MOUT section - windows). I blasted him with my silenced AK from my open window. He didn't fire a shot.
It was down to the last 3. There was gunfire in the north-eastern house. Two Alive. I guessed he was there but I coudn't see anything. I noticed that the door on the western side of the house was open. It was previously not. There had to be someone inside that house. I was able to lean my camera out of the window further than normal since it was open. Thanks to that, I was able to see him jump out of the western balcony of the north-eastern house and behind the north-western house. I'm guessing he knew what building I was in since my windows were punched out. He must have heard it 20 minutes ago. The difference between us is that he didn't see me.
At this point, I had exited from the southern door. I went to the alley where I blasted the guy before. I had near-unlimited meds and ammo so I shot at him from behind cover. I was badly hurt, but because I was behind cover, his shots were ineffective. There was some distance between him and me so I didn't believe that I was going to be grenaded. There was also a good amount of time since the zone just closed in. I used nothing but first aid kits at this point because time was critical. I also stacked up on pills and energy drinks to maximize my healing and running speed.
He was in prone out in the open in the alley waiting for me. So I shot him a few more times, it scared him off. He was wounded. I know he would attempt to cover and heal and not fight. That's what I would do. The new zone was in the north-western building. I took this time to run across the danger zone and in front of the building and around the corner. I'm positive he heard me. I heard him run left, so I ran to the left corner. I saw him behind a wall with a hole. I didn't fire. I was waiting for him to jump over so I could cover/ peek/ blast him. He didn't.
The zone was closing in, I ran inside the building and closed the door behind me. I was now covering both entrances in a room with no windows.
I was getting damaged to the zone and only the northern part of the building was safe.
He died to the zone.
From this story, we can analyze that all of the enemies gave away their position by making too much noise. 4 out of 5 enemies didn't even shoot back since they had absolutely no idea where I was. They had no time to react to being cover/ peek/ blasted. In the end, the only dangerous enemy that I had to fight was the last man, and by that time, I had near unlimited ammo, a ton of meds, and grenades. I was prepared to use indirect fire and pick away at him until he died. The suppressor also allowed me to start engagements without any fear of giving away my position.
Old me would have:
1) not gone from cover to cover
2) not used grenades
3) not kept my inventory cleaned out for rapid pickups thus wasting time
4) made a lot of noise thus alerting the enemy
5) parked my vehicle next to the building i am in thus alerting the enemy
6) not cover/ peek/ blast
7) picked up as much ammo as I could. 200+ is excessive.
8) shot the window railing thus missing.
9) not punched out the windows early thus giving away my position whenever I shot out of it.
10) not used FPS in close combat and the camera would have gotten me killed.
11) gone for that airdrop that was 50m away and got killed.
War Story - Winning Solo 2
I was playing on SOLO-FPP.
I landed in a small unoccupied town and got a rifle and immediately went outside to blast the one guy who also landed here. We fought and he missed every shot. I fired from burst in the crouch from the aimed-hip stance at close range and he died.
I took a vehicle and went towards the center of the new zone. I crossed one of the northern bridges and didn't get shot at all somehow. I waited. The newer zone came up. It was in the northern half of the island, a forested area. I drove near the center, abandoned my vehicle, and went away from it. I went prone near a tree, making sure my body was covered by grass and shadow, and I waited. I normally wear all black for this purpose. I barely made a sound using aim-walking or using the walk-modifier button, and I barely moved.
A guy was near my vehicle. I blasted him with single shot fire. He lived. It was clear he had no idea where I was due to me proning in the shadows. Since he was behind cover, he easily ran away.
A guy started running up to me from the east. Once he was 5m away from me, I blasted him with the burst. I crawled to his body and he had everything I needed. A 4x scope, lots of meds, lots of boosts, and grenades. I went back to my usual spot and waited. I did an inventory dump of all my unnecessary equipment. Less bandages, no more pistol bullets, and less primary ammo (I estimated that 150 was enough). I do this so that for the next loot, I can just grab-and-go easily.
I heard a car driving by from the south. I went a little bit behind the tree, and while prone, I blasted him in the head. His car continued down the hill, which was a great thing for my stealth. I raided his body quickly and went back to my spot. I waited. The new zone was located. I started slow-crawling there. But at that moment, I heard someone loudly crawling from the west. What a mistake. I faced his direction and waited. I set my rifle to burst. He appeared and then I blasted him once his body was out in the open from 5m. I raided his stuff.
I dropped my secondary primary weapon to lower my profile. I was now just using an AK.
I took note of all the gunfire and remembered the directions. I determined that my rear was probably safe.
I crawled towards the new zone and waited. I used some boosts during the downtime so that I would have the heal and run bonuses. The zone was closing in. I crawled some more. I was too slow, and I ended up crouch-walking into the zone and then I immediately went prone. I healed up and used more boosts.
The zone at this point was very small. There was gunfire to my left and right. I was halfway up a very shady and grassy hill. I knew that I was basically invisible as long as I didn't move that much. I threw three random cooked grenades (use R to cook) and one of them killed someone!
It was just 3 people left, a mexican standoff. I needed more information, so I just waited. The last two guys messed up and started firing on each other. One of them died. Now I had enough information to kill the last guy who was at the bottom of the hill but in the new zone. He was in the open, proning in the grass. I carefully positioned myself, still prone, and aimed at him ensuring I could at least do that. With prone, sometimes you can't aim where you want to due to the terrain. I threw two cooked grenades at him. He remained very still.
I blasted him and won.
War Story - Winning Solo 3
Solo-FPP, the way it's meant to be played.
I went near Pochinki and got a rifle. I started running north toward the zone. I went into a village and waited in ambush in one building. I knew people would likely have to come this direction. I saw one guy out the window and he entered another house, waiting to ambush people. My plan now was to wait and ambush this ambusher.
The zone was closing in and I waited in the zone, knowing it wouldn't do that much damage to me. I was out of the zone, and I thought, "wow, this guy is nuts. This new zone is far so I got to go." So I exited away from him and I went into the zone, which wasn't far, and I started running toward the road to find a vehicle. I saw a buggy down the road but refrained from firing because it would reveal my location, draw audio-aggro, and it would be a waste of ammo.
Luckily I found a UAZ. I got in, and headed towards the north-eastern part of the island on the forested mountain. I crossed a northern bridge and somehow didn't get ambushed.
I knew that combat would be very light as very few people even land in this area, and this is far away from the initial drop spots. So I drove the vehicle as far up the mountain as I could. I abandoned it and made my way on the north-eastern corner of the mountain. Knowing that people would likely be in Stalber, I avoided it. I was north-east of Stalber and in the very center of the new zone. The odds of the next zone being near me were high.
I went prone in the grass near a tree. My black clothes blended well in the shadows. I used a little mound of dirt as cover and concealment. I aim-walked in the prone so I could at least fire at any moment.
I waited. I heard gunfire in Stalber. New zone arrived. I heard someone running west of me, so I turned that direction and waited. They were 5m from me. Once their back was turned, I blasted them. I crawled to them and took their stuff. I knew I drew audio-aggro but as long as I didn't move, I was invisible.
I dropped my secondary primary to lower my profile. I waited.
Another guy was running up the western hill towards me. I looked in that direction, waited, and then blasted them when they were 5m away from me. He had lots of loot including a silencer for my M16. This allowed me to fire at will while remaining concealed. I took everything I needed and dumped pistol ammo, lots of bandages, and lots of unnecessary primary ammo (150-200 is enough).
The new zone came. It was a few hundred meters away from me. I figured that people in Stalber would go directly there (away from me). There was nobody to the field out west of me. So my best plan was to go north, hug the zone, and go west using the trees as cover. On the way north, I saw someone but they didn't see me. They were behind a tree, so I went behind a tree and threw two cooked grenades at him and it just nicked him. I heard him running up to me, so I got my gun out quickly and switch it to burst. We engaged and he almost got me. I healed, robbed his stuff, and ran quickly west.
The zone was closing in and I was out of it. I saw a guy in a ghillie suit, I shot at him. He was very confused as to where the fire was coming from since I had a silenced AR. He managed to get cover and escape. I was dying so I ran into the zone, went prone, and started healing. I made my way west toward the rock formation using the trees as cover.
I was getting shot from the southern hill at now since I was out in the open. I went behind a tree, crouched up, healed up, boosted up, and then threw two smokes to cover my approach into the zone. I faced west towards the other enemy, just in case.
I waited for the smoke to build and ran toward the rocks. I was getting shot at. I healed up again, and boosted up some more. The guy that was shooting at me made two critical mistakes.
1) He revealed his location.
2) He didn't kill me.
The other two guys shot at each other. The last guy (not ghillie man) alive near me had no idea where I was since I didn't return fire. I went prone near some rocks, ensured that I could aim freely by aiming around. I was in the last zone and so was he. I was in the grass in some shadows. He popped up, I blasted him from the prone firing from the hip at 10m. A series of misses. He didn't even fire back since he had no idea where I was. He popped up again, body wide open.
He popped up and I blasted him with 4x-scoped single fire.
War Story - One Man Bloodlust
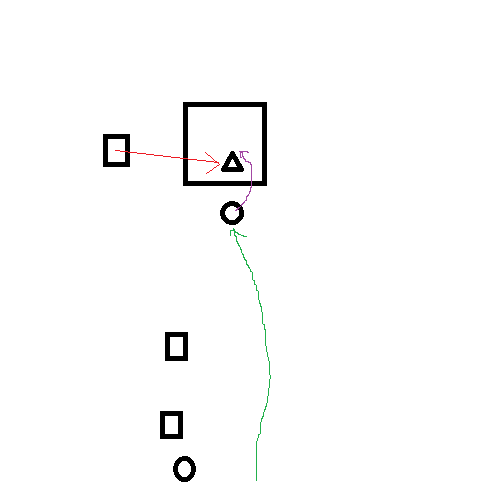
Firemagzz and I are headed into the zone. He flipped the bike and caused me to go down. He revives me and I'm very wounded. We hear a vehicle so we go prone and look. A vehicle stops next to a bunker and a ghillie man goes inside the first floor. Firemagzz has the bloodlust. I advised him that I need to heal and we can wait a second since that guy has no escape and is unaware of our presence. I said, "I can't cover you, just wait, please. He's trapped." He said he was going to throw a grenade and I replied to at least cook it.
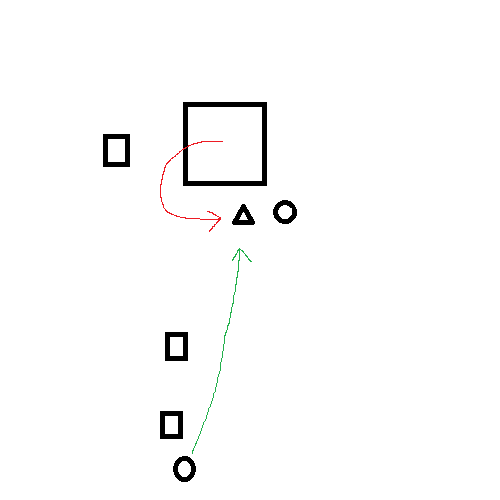
Firemagzz throws the grenade inside, the man has enough time to go outside and blast him and down Firemagzz. I immediately moved in to blast the enemy. He was killed.
Firemagzz says, "Lets go inside and you heal me." He goes inside, I close the door and dies instantly. A clear lack of communication.
I was completely dumbfounded.
War Story - Taking a Hill
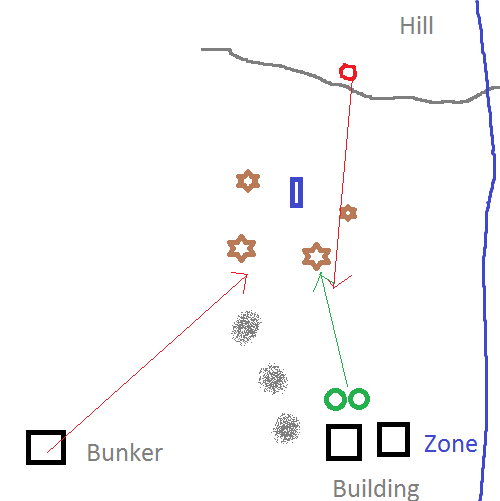
Firemagzz and I are in a building. We're stuck here. We just blasted 2 people who came in and stole their stuff. The zone is closing in, and we have to go above this hill. We know that there are people out in the bunker. We saw them, heard gunfire, and we see their buggy. We saw people drive up the hill.
Without the pre-planning, we probably would have been shot from all sides and been extremely confused.
Instead of browsing the internet, or fiddling with your phone while waiting for the next zone, we started pre-planning.
We expected lots of fire from bunker, and the hill. The buildings next to us are probably unoccupied since we didn't hear anything. So we smoked the open ground facing the bunker and ran up the hill. We were taking fire. We only had to look at two places: the bunker and the top of the hill. It was the hilltop. Since we expected it, we reacted must faster than normal. I blasted him with my rifle and he died instantly. No teammate.
Because we pre-planned, we were able to expect what would happen which minimized panic and helped us react much faster.
War Story - Free Stuff
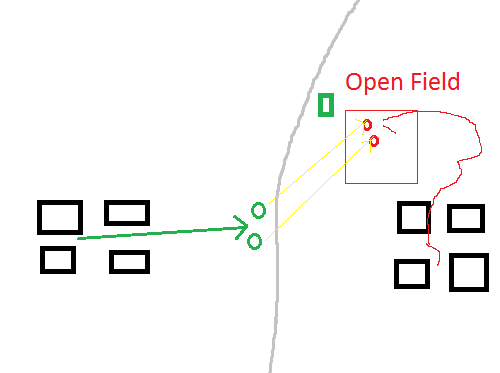
I was playing with my buddy Falken.
We landed into a village. An enemy team parachuted in a neighboring village about 300m away. We took note of it. We raided our village and decided to find and engage the enemy team. On our way, I saw a vehicle far away on the road. I guessed that the enemy is still here in the village and they know about the vehicle and will take it. There's nothing but open space towards the vehicle. All we have to do is wait for them to go out into the open and then we'll blast them. I informed my teammate of my plan.
We went behind trees and waited until the enemy popped up. All we needed to see was one guy. Falken saw one. He continued to feed me information on their exact positions and how many he saw. We waited until they were half way to the vehicle and blasted them from behind cover.
One guy immediately jumped up, did a 360 degree spin, landed, and then died. His buddy, without cover, died shortly afterwards.
We stole their stuff, took the vehicle, and left.
First Person Perspective (FPP) Mode
In this mode, your field of view is strictly limited. You'll still have to use what you know from the regular game.
You can no longer abuse the third person camera.
You have to heavily rely on audio.
Enemies are less aware of surroundings and so are you.
Half the enemies seem to die by the time zone 2 begins.
If you and your enemy are prone in a flat field of grass, you are both invisible to each other until you get closer.
Willpower and Morale
This game may become irritating at times. You will get angry at getting to #2 and then dying because you were cursed by the RNG gods and zoned-out, or you were blasted by a guy with a ghillie suit with an AWM from on top of a hill. It happens. It is the nature of the game.
If you can change these things, then you would change them and then you would not be angry. But you cannot change these things and thus you must accept what you cannot change. To be angry is reserved for tragic actors.
Even pro-streamers cannot win most of the time due to the randomness of the game.
Try not to take your anger out on your teammate. It takes time for your team to become a cohesive, functional singular unit where little can be said, but everyone just does stuff
Reflect on your death and what you could have done differently and change.
Losing frequently due to bad RNG is demoralizing. So play a few "joke" games to calm you and your teammates down and raise that morale.
Killing people normally feels good, so try to find and kill some people. Here's a list of stuff you can do to have high action
- Punch last-to-jump idlers
- Go into suicide zones (high loot areas)
- Find and assassinate people
- Drive by shootings
- Go towards the gunfire
- 1 vs Squads.
As for your stats and k/d and ranking, they get reset so who cares. Don't worry about your statistics
Hacking & Cheating
This section will talk about hacking and cheating occurances. Please play with honesty.
Multi-Squads
Two or more squads will join the same game and agree not to shoot each other. This gives them an unfair advantage. They may attempt to wear the same fashion like afros or red shirts. Below is a video of a crazy Korean handling such people:
One-Punch Man
A Hacker killed everyone by punching everyone at the same time.
Conclusion
If you die, don't get angry. This game is brutal, and the win rate is lower than 5% for the average player. There is also a significant element of luck involved.
80% of the time, you'll die because you made too much noise or some noise was made near you, and the enemy found and blasted you.
10% of the time is because you were "zoned out" and had to run through 500m of open dirt to get "zoned in" and you ended up being blasted by a sniper.
10% of the time is because you kept getting bad loot and all you had to fight these people with is a mustache comb.
I normally have an after-team debrief and ask where we could have gone better or what went wrong.
Me: We kept getting zoned-out.
Firemagzz: Yep. Good game
Me: Good game.
- Youtube has more indepth information on the subject. Bring it to my attention by commenting below.
- Watch pro-streamers on Twitch. Such as:
Summit1G Youtube
- Play and talk with your friends.
- Check out PUBG mythbusters for more obscure tactics.
- Check out MagnumDopus (Youtube)
"To stop a monster, you must become one."
- I highly recommend that you watch: pro-streamers or highlight videos on youtube. You can see how fast these people move, how erratic their movements are, how they shoot, how they evade the enemy, etc.
- I recommend watching this movie:
Enemy At The Gates[www.imdb.com]
- Check out your stats (or mine "Humanvegetable") here:
PUBG Stats[pubgtracker.com]
- Watch PUBG Fails here
Like
Favorite
Share
Comment
Leave some feedback or advice. If there are any problems, leave a comment below. Let's grow this guide and trade information.
Subscribe to my youtube channel! I'll make some gameplay videos!
>>>MY YOUTUBE CHANNEL<<<
I'm going to delete spam comments and "you're a noob, you have less than 10,000 hours" comments.